Showing posts with label fondant. Show all posts

Friday, 13 March 2015

Minim Confection

What do you give to someone to thank them for the wonderful gift of a phenomenal book?  Manuscript-themed cupcakes, of course!  At least this is the sensible course if the book is a manuscript facsimile.  That, and I may have been on a bit of a cupcake kick at the start of the year...


Because I'm a nerd, I wanted the cupcakes to spell out 'diolch am y lyfr' (Welsh for 'thanks for the book'), and my first thought was to cut out circles of fondant, paint them with a textura or gothic script and place them on top of smooth-topped cupcakes.  Fortunately I came to my senses and realized that mini fondant manuscripts would be so much cooler as toppers, so that's what I made.  I used initials, decorated with red for each new word, on the pages to spell out my message of thanks.


Admittedly, the cupcakes themselves are as much the superfluous part of this post as they were the superfluous part of the gift.  That being said, they were pretty good.  They were a variation on my whisky cake, in that the chocolate cupcakes were filled with chocolate and Guiness ganache and topped with whisky buttercream.  I used this recipe from Joy of Baking for the cupcakes, and be careful to note that the recipe makes sixteen cupcakes.  Since the average tray has a dozen cups, this could be a problem, and you should be prepared for it before it comes time to pour the batter.  Since I only have one cupcake tray, I poured the excess batter into two small greased and cocoa-powdered souffle dishes.  This meant that in the end I had two 3-4 inch cake layers going spare... perfect for a bonus tiny cake.  The cupcakes were generally nice although they came out somewhat fudgier than I might have liked; others liked the fudginess, so this is personal preference.  The only change that I made to the recipe was using hot coffee in place of hot water, because coffee strengthens the flavour of chocolate cake.  I may also not have mixed the hot coffee with the cocoa poweder - too much time has passed now to remember - and it might be this that resulted in said fudginess.  The cupcakes were also quite susceptible to cracking when coring them to fill with ganache, possibly for the same reason.  If you pipe the ganache into the centres of the cupcakes with a piping bag and do not use too much pressure, it should not be terribly problematic.  The recipe for the swiss buttercream is in the Recipe Box, just add whisky to taste, and the same goes for the recipe for ganache but adding Guiness to taste.


I did learn something valuable in making this ganache: how to fix a broken ganache.  I can safely say that I had never broken a ganache before (I must have been lucky), so when it happened I wasn't sure what I was looking at.  I had been unable to buy my preferred ganache-making chocolate, so my first instinct was to blame the lumpy, oily mess on low-quality chocolate.  I tried draining off the oil, reheating the mess, stirring and stirring and stirring, and it still looked gross.  I wondered if adding the Guiness had caused the problem, but since it was clearly oil sitting on top of the chocolate and not stout, that did not seem to be the issue.  Finally I googled  'broken ganache' and found Matthew Kayahara's blog, where he explained that a broken ganache is the result of an unbalanced fat-to-water ratio, with the fat content being too high.  To fix it, heat some low-fat milk and, very slowly, incorporate it into the ganache until everything comes together and it looks like the smooth chocolate confection it should be.  Where did bakers and chefs go for answers before google?  Medieval scrolls, I guess.


On to the manuscripts!  I knew how I wanted my books to look, and a vague idea of how to get there, but for tips I googled (again!) and found this how-to from A Grey Eyed Girl.  She provides a very good step-by-step, complete with pictures.  I used different tools, but followed her closely with variation in the details (turned up edges or corners of pages, thickness of the book, lift of the pages from the binding) for each manuscript.  I also coloured my fondant with a mix of red, yellow and black gel dyes, just as I did with my Black Book of Cake manuscript cake, to make it resemble vellum.


Colour a ball of fondant to your desired shade, and break off a small lump for your first manuscript.  Shape it into a soft rectangle.


Using the blunt edge of a knife or a fondant or gum paste cutting tool, slice into the centre of the rectangle, approximately halfway through it.


Using a round pencil or another fondant tool for which I do not know the name, widen the incision and spread and smooth the pages on either side so that they resemble the wings of a bird if viewed from the bottom or top edge.  Trim the left and right edges of the manuscript at an angle to mimic the spread of the pages of an open book.


With the tip of the knife or cutting tool, draw the lines of individual pages into the top and bottom edges of the book, following the wing-shape you created.  On the right and left edges create the pages by pressing in with the length of the blade, rather than drawing the lines with the tip.  Turn up the corner of a page by gently sawing into it and lifting.


For the binding, roll out fondant of a different colour (I prefer black) and trim it to the size of your manuscript.  Round the corners a bit if desired, and create the spine by placing two indents on either side of the sheet using a toothpick.


To paint on the 'text', you will need a fine brush and more of the gel dye used to colour the fondant.  As I showed in the Black Book of Cake, to paint with these gels it is helpful to thin them out using a clear alcohol such as gin or vodka.  As the paint dries this will evaporate, so there's no worry if feeding the fondant to kids!  By thinning the dyes, it is possible to adjust the consistency and the transparency of your colours.  Having the alcohol and cotton swabs on hand is also helpful in the event that you make a mistake, because if you act quickly it is possible to wipe it off using an alcohol-soaked swab or paper towel.


Because I did not take photos throughout the process of making the first batch of manuscripts, I made one more to top off the bonus tiny cake I mentioned earlier; this is the manuscript featured in my step-by-step.  I painted this one slightly differently, in that I included both coloured initials and 'text' on the same page, rather than the sort of carpet pages I made in my thank you cupcakes.  The 'text' of all of the manuscripts I formed purely out of minims; there weren't enough hours in the day for the level of procrastination that it would have taken to copy true tiny texts into these miniscule manuscripts, and fortunately minim confusion is not an issue on pages that are going to be eaten...

Friday, 13 June 2014

The Black Book of Cake

A year ago when I started Procrastibaking (the blog, not the past time; the past time is well established), I wondered, 'How long am I going to be able to keep this malarkey up?'.  Well, happy first birthday Procrastibaking!

My first ever blog post was about a cake that I made for a cocktail party.  The party is annual, and though last year I decided that the appropriate cake for a cocktail party was one that contained booze, this year I decided to draw on the medieval department throwing the fête; I made a manuscript cake.


There are numerous examples of book cakes out there in the internet, some of them better than others.  There are fewer sets of instructions for making them, however.  An exception is provided by Jessicakes, where you can find very detailed directions for making an open book cake (which was what I was after - where's the fun in a closed book?).  I appreciate the attention to detail that Jessica put into her cake, and especially the thought devoted to its structure.  Up until the day before I put the cake together, I was going to follow her example.  Then two things happened.  The first was that the only foam board (needed to support the spine) that I could find was expensive.  The second was the realization that no library would ever allow a precious manuscript to be laid open flat on a table.  Manuscripts need to be supported by pillows so that a tight binding doesn't result in torn pages; they should generally not be open flat.  Instead of two layers of cake laid out side-by-side, then, I decided that I was going to stack a smaller rectangle cake (the book) on top of a larger rectangle cake (the pillow).


I had already baked two layers of cake when I changed tack.  At least, they were two layers baked; in reality they were four layers worth of cake, as I had to double the recipe to fill the roasting pans I baked them in.  Have you ever wondered if you could bake cake in a roasting pan?  Wonder no more!  I greased and floured the pan like any other.  Then when I lined it I used extra-large rectangles of parchment so that there would be enough to go up the sides of the pan.  Just fold the parchment over itself at the corners to form to the pan, and trim some of the excess if necessary (I found that having a bit to grab onto to pull the cake out was helpful).


Having made it this far into the post, it's probably time I talk about the cake cake, the actual stuff that was inside the manuscript.  Because the decoration of the cake was going to be rather complicated, I wanted the cake itself to be relatively simple.  I opted for a basic (but yummy) yellow cake, layered with raspberry jam and iced, of course, with buttercream (a necessity for fondant cakes).  I adapted this recipe from Real Simple, and my version can be found in the Recipe Box.


I won't dwell on mixing the cake here: combine dry ingredients, beat sugar into butter followed by eggs and vanilla.  This recipe calls for milk (I substituted buttermilk) and this should be combined with the beaten butter in five alternating additions with the dry mix, starting with the dry mix.  Then into the roasting-turned-cake pan it goes!


Then rinse and repeat.  Also, make some swiss meringue buttercream.  The recipe is in the Recipe Box, with additional directions available in Great Chieftain o' the Puddin' Race and Sophisticated Swine.  For this cake I added two tablespoons of lemon extract, because who doesn't love a raspberry and lemon combo?  The only other thing that I'll add about swiss buttercream in this post is that, as with any recipe that calls for separating eggs, it is prudent to do the separating over a bowl that is not the bowl you are collecting the whites in.  I didn't do this.  I never do this.  And it's always the last yolk that breaks into the whites. *sigh*

It's no use crying over a broken yolk.

I still wasn't quite sure how I was going to create the book even after I'd decided to stack it on a pillow.  I knew that I would cut one of my two layers in half and turn it so that it was wider than it was tall, just like the pillow base.  It was creating the angles of an open book that I wasn't certain of.  I googled something along the lines of 'angled cake' and came up with a Wilton post on topsy turvy cakes.  In the end this didn't affect how I made the book - which I decided to simply carve - but it gave me the idea to set the book into the pillow layer, to really give the impression that the pillow had moulded around the book.


I started the process by splitting the pillow layer (remember to do this when the cake is cold but not completely frozen, so it isn't crumbly but also not impossible to cut) and then I filled it with a layer of jam.  The next step is to carve the hole for the book to sit in.  Though it's not what I did, it might be cleaner to do this from the top layer alone, before it is joined with its jam-covered bottom.  In this way, rather than peeling the carved-out top layer from the hole, as shown below, the top layer could be carved and then lifted (leaving the hole behind) onto the prepared bottom layer.  The risk here is that the edges of the top layer are too thin, and in the lifting the cake would break.  Freezing the layer would make it more stable, however, and if you like a gamble...


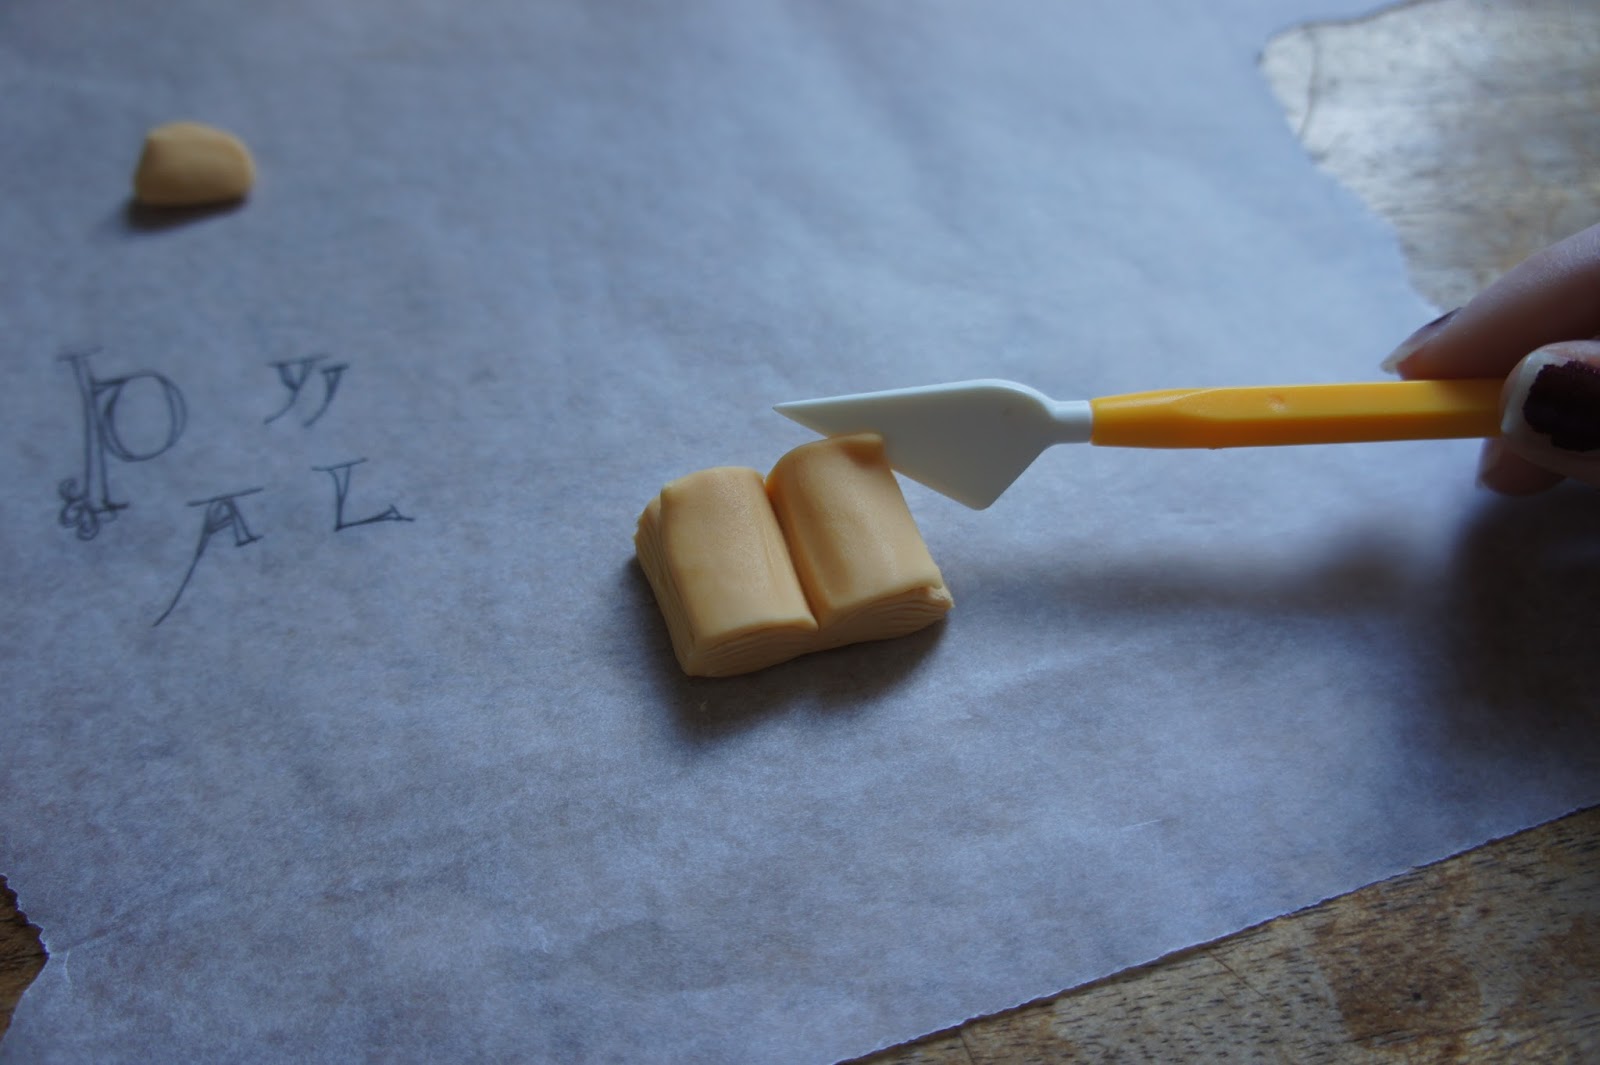
After I cut the book layer in half, I rounded the corners to make it more manuscript-like.  Then I placed it on top of the pillow and used toothpicks to mark the edges of where to carve.  This worked fairly well, though the hole should be widened a bit after carving because once the cake is iced and covered the space otherwise becomes just a little too tight.


Gently use a small offset spatula to remove the centre of the hole.  I then carved the edges to slope inward and deeper in the middle, to reflect the shape of a pillow with a manuscript in it.  Next ice this part of the cake with buttercream and place it in the refrigerator or freezer to harden while finishing up the book.  Because I was going to be sinking the book into the hole of the pillow, I decided to stack both halves of the second layer to make a very tall manuscript.  I split the layers and then shaped the open pages by marking a line down the middle of the cake and carving down and inward towards that line from just inside of the right and left edges.


Once carved, I iced the book with buttercream.


One mistake I made was taking the pillow out of the freezer and letting it sit only ten minutes or so before covering it with fondant.  Covering a cake that is too cold can make the fondant sweat, and that's what happened.  Fortunately for me, I had already imprinted the fondant with a paper towel to get a fabric-like finish on the pillow, so I continued to use paper towels to remove the sweat.  This will obviously not work for a cake that needs smooth fondant.  Another trick, which, combined with time to dry out worked quite well, was brushing the fondant with corn starch.  I used a large clean makeup brush and lightly powdered the fondant.  By the morning the cake was perfectly matte!


Don't forget, when colouring fondant don't use standard liquid food dye - this will make the fondant very sticky, especially with the quantity it would take to make the colour dark.  To make the flesh colour of vellum (the calf skin from which the pages of many medieval manuscripts were made) I used a combination of yellow, some red and a little black.  After I finished mixing the colours but before I rolled out the fondant, I put the book in the freezer for a few brief minutes, just so that it would be a little stiff when I had to pick it up and put it in the pillow.

This fondant is still too thick to use for covering.

Covering the book was relatively problem-free, but as with any cake with angles you have to handle the fondant gently around the corners and smooth it quickly before it dries and cracks.  Thicker fondant will hide more of the flaws under it, and will be a little less likely to tear on the corners, but for me, taste-wise, a thinner layer of fondant is desirable.


When I iced the book, I wanted the edges to be rounded.  If I had been making a modern book, with their precise and sharp corners, my book would have been too soft, and this softness was only amplified when I put the book into the pillow.  I hadn't made the hole quite large enough to compensate for the additional girth of the buttercream and fondant, so the fondant on the sides of the book billowed out a bit when they pushed up on the edges of the hole, and simultaneously the fondant on on part of the pillow was pulled down by the book and tore - but what else is a book cover for if not for covering tears in fondant?


But before I made the book cover, I made four pages to lay on top of the book to give it more depth.  Using an offset spatula I pressed lines into the side of the book to give the impression of pages, but manuscript pages often don't lie flat and the edges may be a little wrinkled or warped, so adding a couple of pages on top reflected that.  If I were to do it again, however, I would try to make the indentations of the lower pages more pronounced to better blend in with the top pages.

To make the top pages even more realistic, I lightly pricked holes all over them to look like the pores in vellum.  I also cut out a large hole (holes are often found in vellum, especially if it is of a lower quality), and poked holes vertically along the outer edges of the pages to mark the ruling.


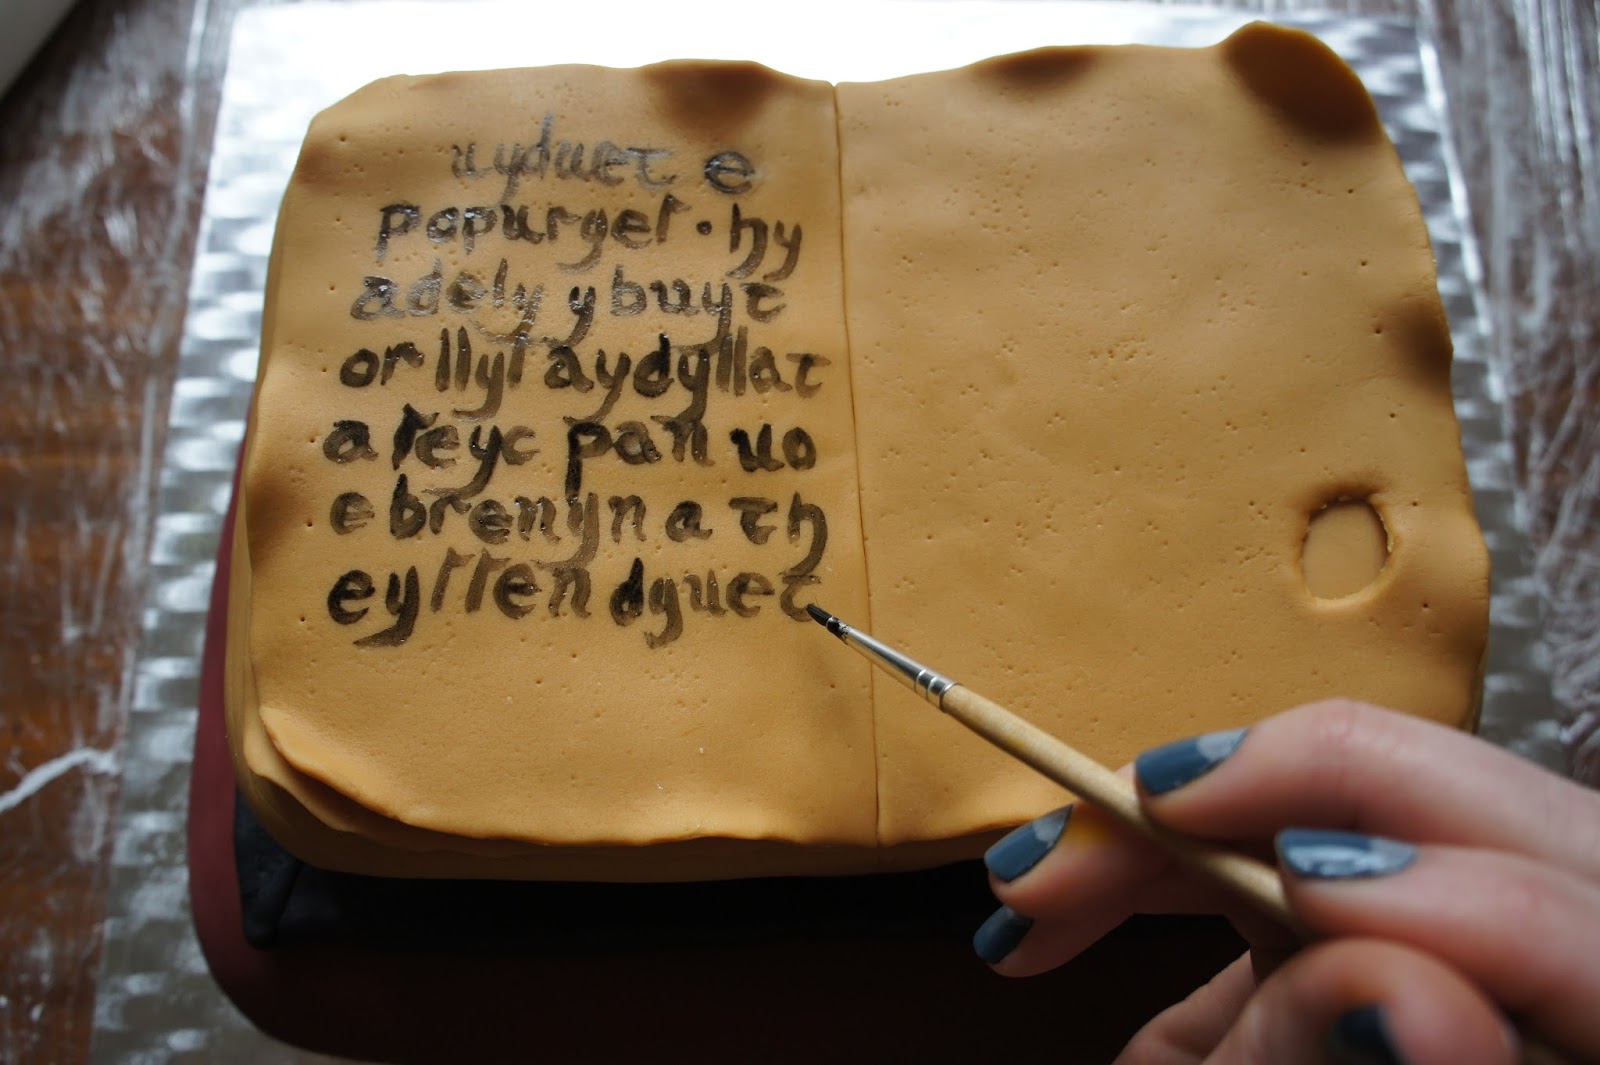
After some debating, I decided to paint a real text on the manuscript, and after some more debating I chose a passage from the Medieval Welsh Laws of Hywel Dda, specifically from a section on the Laws of the Court.  The version I used is from National Library of Wales Peniarth 29, The Black Book of Chirk (Llyfr Du o'r Waun), and it outlines the rights of the court bakeress - perfect for a manuscript cake!  For anyone who is interested (because this post isn't long enough already):
'Huyduet e popuryes hy a dely y buyt or llys ay dyllat a seyc pan uo i e brenyn a theyssen dyuet poby o pop amryu ulaut a pop. ay guely en e buyty. ny dely keuody rac neb tra uo en poby. y naud eu hy y buryho ay crauell. y sarhaet eu trayan sarhaet y gur ony byt gur hanner saraet y braut y guerth na hy a uo guedu na hy ny uo hanner guerth y braut.'  (Peniarth 29, p. 27)
'Eighth is the bakeress.  She is entitled to her food from the court and her clothes and a dish when the king is present, and at the end of the day a cake from each type of flour which was baked, and her bed is in the kitchen.  It is not right for her to rise for anyone when she is baking.  Her protection is as far as she can throw her spatula.  Her value is a third of her husband's value unless her husband is half the value of her brother; her value, should she be married or not married, is half the value of her brother.'
For painting the cake, I used the same gels that I had used to colour the fondant (excluding yellow).  I'd never painted on a cake before, so I got some tips from That Really Frosts Me and The Hand-Painted Cake, a free Craftsy class by Erin Schaefgen (Craftsy is a pretty useful tool; I haven't paid for a class yet, but I know people who have and have really enjoyed them).  Fortunately my sister had given me a whole set of brushes at Christmas for just this type of production, so I was ready to go on that front, but I also purchased a cheap thing (it was in the kitchen section - to be honest I don't know what its intended use is) to mix my gels in.  You mix the gels as you would paint, the primary difference being that you dilute them with a bit of alcohol, which evaporates as the colour dries.  Vodka is widely recommended but I used gin - as long as it's clear and edible it doesn't matter.


The style of my manuscript was based on National Library of Wales Peniarth 1, The Black Book of Carmarthen (Llyfr Du Caerfyrddin), and the cake was even fairly close to the real manuscript's size.  Part of the charm of the Black Book is its size; it's a small book, often considered to have been the personal collection of a single scribe.  Despite its not being a grand professional production, however, it is nicely decorated with drawings in the margins, an unusual feature for Welsh manuscripts.  Naturally I drew on that and painted a hand holding the pivotal word crauell, 'spatula'.  Everything I painted I wrote out first on a piece of parchment paper the size of the book, and I kept a piece of spare fondant out to practice on.  Having a small container of gin (or vodka) and q-tips to hand is also useful, because they can be used to erase mistakes if you act fast.  Just dip the end of a q-tip in the alcohol and rub out the error very gently, perhaps using the other dry end of the q-tip to clean it up further.


I had already made my binding by this point.  The Black Book of Cake needed a black cover, naturally, so I dyed some fondant black and rolled it out, cutting four strips and inch or so wide and a bit longer than the sides of the manuscript to which they would be applied.  The overhang on the corners should be cut at a 45° angle so that they can be joined up (just press them lightly together and smooth if necessary).  Using the handle of my paintbrush I made two indentations to mark the spine on both the back and the front of the manuscript.  The final touch was to make a pair of  'snakes', lengths of curtain weights which are used to hold manuscripts open without causing them any damage.  I made these by rolling out plain white fondant into thin ropes and then segmenting them by squeezing them between the tubes of two q-tips.  In the end I opted not to drape the snakes over the manuscript because 1.) they were coming apart if too much gravity pulled on them and 2.) I'd just spent all that time painting the thing, why cover it up?  Only one person at the party called me out on that; the librarians would not be pleased.

Friday, 15 November 2013

Sophisticated Swine

If the cake has been commissioned, is it still procrastibaking?

The answer is yes and no.  Yes: if the commission is accepted, so is the time commitment, and therefore whatever it is that really should be getting done is not getting done.  No: when you're baking a cake that's not for yourself but rather for someone else, the pressure is on in a way that it obviously isn't for the average procrastibake.

Plus, you don't get to eat it.

Does this really matter?  No, probably not; payment compensates enough for the pain of pressure/lack of face-stuffing.  And in this particular case, so do fondant pigs.

My commission, should I have chosen to accept it (spoiler: I did) was to make a 'sophisticated pig' cake for a 15 year old's birthday.  These were admittedly puzzling instructions (my friend suggested a pig with a monocle), but they weren't anything much stranger than some requests I'd had or heard of working in the bakery.  To complicate matters a bit, the birthday girl didn't like chocolate (*gasp!!*), and so the little piggies could have no mud to play in. She also didn't like nuts, so marzipan was out.  Starting from that, I concluded that I needed fondant for the pigs and buttercream that I could sprinkle cookie crumbs on to signify dirt; not chocolate cookies though, no no.  Everybody loves vanilla cake with strawberry (and if they don't we can't be friends), so that was my suggestion for the cake itself, and happily it was met with approval.

This little piggy bought some fondant...

The first step was to make the fondant pigs, a.) so that they'd have time to dry out before I put them on the cake and b.) so that I didn't have to mess around with them on the day, risking something going wrong. I used google images to try to get some inspiration, and happened upon this great tutorial from candy ribbon sweets.  I won't give complete instructions here because they've already been so well done there.


I bought red fondant because the store was out of pink, but this actually worked to my advantage because it meant I could really control the colour by mixing a small amount of it in to a ball of white fondant.  I also added a touch of black fondant just to make the colour a little less bright and a little more natural.  I added some tylose powder to dry it out, and had a raw spaghetti noodle on hand to attach the piggies head to his body.  The first step is to roll out one ball for the body, a smaller one for the head, four even smaller ones for the feet, and, continuing to downsize, one for the snout and two for the ears.  You may want to cover the balls with a piece of saran wrap to prevent drying as you go along, although I didn't find this to be a problem.

Squeeze the tops of the legs so that they will be narrower where they attach to the body with fatter hooves, and attach them to the body (it helps if you rub a little water on the body where attaching legs to help them stick).  Using a decorating tool as shown on candy ribbon sweets, or simply using a knife, press a line into the hooves to create a cleft.  Poke a bit of raw spaghetti into the head or body where you want to attach them, moisten whichever piece doesn't have the spaghetti in it, and stick the head to the body (being careful not to poke the spaghetti all the way through one side or the other).  Mold the ears by making triangles and indenting them either with a decorating tool or a q-tip, attach them to the head, and mold the snout by pressing the final ball into a flat disc.  Attach it, and poke holes for nostrils with some of the left-over spaghetti.


I made two pigs, one perky and one pretty sleepy, and made extra noses/buttons with the leftover pink fondant to use as decoration on the bottom border of the cake.  I also made some ribbons with plain white fondant, using a handy ribbon-cutter tool that a caking friend suggested that I pick up.  They're quite nifty little things which came in a three pack of different sizes, and I can see how they'll be useful if I ever need to make a bunch of ribbons, as they're a bit faster than free-hand cutting, with much more consistent results.  There is a learning curve to getting the fondant pieces out of the cutter, but once you're past that it's a breeze.


This little piggy made swiss buttercream...

With all the fondant work done, the next step was to make the cake.  I used the Verastile Vanilla cake in the Recipe Box, originally from Martha Stewart, but since I've discussed it before I won't do it again here.  It doesn't really require much discussion anyway, it's vanilla cake!

The more exciting (read: time-consuming, dreams-of-a-stand-mixer-inducing) cake component was swiss meringue buttercream, the recipe for which can be found in the Recipe Box.  As the name implies, this buttercream is meringue-based, which is what can make it temperamental, but which is also why I like it.  Because it contains meringue, it is much lighter than the run-of-the-mill pure butter and confectioners sugar buttercream, and it is likewise often less sweet, although you can push it to the sicklier side of sugary if you so desire.  I don't.  This is also the type of buttercream often seen in wedding cakes, because it can be so silky smooth, and by substituting shortening for butter (*blegh*) you can make it pure white; substituting part shortening also helps prevent it from melting if you live in a warmer climate (I learned that on Craftsy watching their free 'Modern Buttercream' lesson - it's quite a useful tool for learning new tips!).

The first step to this buttercream is making the meringue, which is just sugar and egg whites.  I've found that using castor sugar is preferable to granulated, because the finer granules dissolve more quickly in the whites than do the larger ones.


I also tended to use golden castor sugar, since it gives a nice antique white colour.

 
Whisk the egg whites and sugar together and then set them over a simmering double boiler, whisking constantly.  Failure to whisk will result in very sugary fat-free scrambled eggs, and nobody wants that.  Continue whisking over heat until the sugar is completely dissolved.  (If you have a candy thermometer, this may be around 145F/62C).

When the sugar is completely dissolved, remove the whites from the stove and whip them to a stiff peak.


Allow the meringue to cool to room temperature before proceeding with the next step, which is to add the butter.  Butter should be added in pieces, either at room temperature or slightly cooler; if your meringue is still too warm and the buttercream won't come together, adding more, colder butter may help, as might popping it in the fridge for a bit, or adding confectioners sugar... but I'm getting ahead of myself.

 
Adding the butter will first soften up the meringue, but as you continue adding and beating (which is preferably done with the paddle attachment of a stand mixer, if you have one, because if creates fewer bubbles than egg beaters or a whisk), things may start to look a little startling...
 
Breaking down...


Near the 'scrambled egg' phase.
 
Hel-lo buttercream!


While the sequence of events may look disturbing when all you want is nice smooth buttercream, don't be alarmed.  Once you get past the scrambled egg phase - and if you're using a hand mixer, this may take quite a while - you can pretty quickly see the buttercream pulling itself together, and if you are using a hand mixer, you should be able to feel the change in consistency as well; it becomes much thicker than what it was in the sickly-looking broken-down stage.  If you're making the buttercream ahead and refrigerate it, note that you will have to re-whip it and go through these stages again.  Once finished the buttercream can be flavoured with vanilla or other extracts to taste (or other flavours too; whiskey is a personal favourite).

This little piggy put it all together...

I also made the cake itself ahead and froze it, letting it thaw a bit before I was ready to use it.  Freezing serves a dual purpose of preserving the cake's moisture, and making it less crumbly when splitting the layers.

'My, what a white bottom you have...'
 
I was interested to notice this time around just how much lighter the bottom of the cake was than the sides.  It's possible that they've always baked like this and I just never noticed, but I think it might be as result of the new pans I bought last month, with their light bottoms and dark sides, furthering my suspicion that they really do help to bake an even layer.

By contrast, I toasted my crushed biscuits in the oven to darken them up.  In the end they still resembled sand a bit more than dirt, but oh well.  What are you going to do when chocolate is off the table?  (If you're me, you'll probably wipe the residue off your face before someone realizes you're the one who swiped it).


Then I put it all together!  I layered the jam first with the buttercream on top, which was a bit difficult as the strawberry chunks made it impossible to get an even layer in the jam, and the kept poking up into my buttercream as I tried to spread it, mixing the two together... really no one but me was going to be bothered by this, and short of entering a competition it doesn't matter, but it would have been easier had I used a jam without pieces.  Layering buttercream first would have meant the jam would sink right into it, unless you worked layer by layer, freezing them between to solidify the buttercream before adding the jam... too much trouble it seems, and probably all to be undone once it returned to room temperature.


When icing the outside of the cake, it's best to put an excess of buttercream on the top, pushing it a bit down over the sides, and then using your offset spatula or palette knife to frost the sides, bringing the buttercream up to meet the bits that overhang from the top.  Then you can smooth it all out and remove the excess buttercream.  Following this a ridge will likely form around the outer edge of the top of the cake, and the corner can be sharpend by pulling this down and inward toward the centre of the cake.


Once iced, use your offset spatula to lift the cake onto on hand, and with the other hand scoop handfuls of crushed biscuit, cookies or sprinkles out of a shallow bowl and up around the sides of the cake.


Gently lower it onto a drum board or plate before finishing it off with a border, and, depending upon the occasion, perhaps some sophisticated swine.

These little piggies went 'wee wee wee' all the way to the party...


And this little piggy had none.


The End