Showing posts with label chocolate. Show all posts

Friday, 13 March 2015

Minim Confection

What do you give to someone to thank them for the wonderful gift of a phenomenal book?  Manuscript-themed cupcakes, of course!  At least this is the sensible course if the book is a manuscript facsimile.  That, and I may have been on a bit of a cupcake kick at the start of the year...


Because I'm a nerd, I wanted the cupcakes to spell out 'diolch am y lyfr' (Welsh for 'thanks for the book'), and my first thought was to cut out circles of fondant, paint them with a textura or gothic script and place them on top of smooth-topped cupcakes.  Fortunately I came to my senses and realized that mini fondant manuscripts would be so much cooler as toppers, so that's what I made.  I used initials, decorated with red for each new word, on the pages to spell out my message of thanks.


Admittedly, the cupcakes themselves are as much the superfluous part of this post as they were the superfluous part of the gift.  That being said, they were pretty good.  They were a variation on my whisky cake, in that the chocolate cupcakes were filled with chocolate and Guiness ganache and topped with whisky buttercream.  I used this recipe from Joy of Baking for the cupcakes, and be careful to note that the recipe makes sixteen cupcakes.  Since the average tray has a dozen cups, this could be a problem, and you should be prepared for it before it comes time to pour the batter.  Since I only have one cupcake tray, I poured the excess batter into two small greased and cocoa-powdered souffle dishes.  This meant that in the end I had two 3-4 inch cake layers going spare... perfect for a bonus tiny cake.  The cupcakes were generally nice although they came out somewhat fudgier than I might have liked; others liked the fudginess, so this is personal preference.  The only change that I made to the recipe was using hot coffee in place of hot water, because coffee strengthens the flavour of chocolate cake.  I may also not have mixed the hot coffee with the cocoa poweder - too much time has passed now to remember - and it might be this that resulted in said fudginess.  The cupcakes were also quite susceptible to cracking when coring them to fill with ganache, possibly for the same reason.  If you pipe the ganache into the centres of the cupcakes with a piping bag and do not use too much pressure, it should not be terribly problematic.  The recipe for the swiss buttercream is in the Recipe Box, just add whisky to taste, and the same goes for the recipe for ganache but adding Guiness to taste.


I did learn something valuable in making this ganache: how to fix a broken ganache.  I can safely say that I had never broken a ganache before (I must have been lucky), so when it happened I wasn't sure what I was looking at.  I had been unable to buy my preferred ganache-making chocolate, so my first instinct was to blame the lumpy, oily mess on low-quality chocolate.  I tried draining off the oil, reheating the mess, stirring and stirring and stirring, and it still looked gross.  I wondered if adding the Guiness had caused the problem, but since it was clearly oil sitting on top of the chocolate and not stout, that did not seem to be the issue.  Finally I googled  'broken ganache' and found Matthew Kayahara's blog, where he explained that a broken ganache is the result of an unbalanced fat-to-water ratio, with the fat content being too high.  To fix it, heat some low-fat milk and, very slowly, incorporate it into the ganache until everything comes together and it looks like the smooth chocolate confection it should be.  Where did bakers and chefs go for answers before google?  Medieval scrolls, I guess.


On to the manuscripts!  I knew how I wanted my books to look, and a vague idea of how to get there, but for tips I googled (again!) and found this how-to from A Grey Eyed Girl.  She provides a very good step-by-step, complete with pictures.  I used different tools, but followed her closely with variation in the details (turned up edges or corners of pages, thickness of the book, lift of the pages from the binding) for each manuscript.  I also coloured my fondant with a mix of red, yellow and black gel dyes, just as I did with my Black Book of Cake manuscript cake, to make it resemble vellum.


Colour a ball of fondant to your desired shade, and break off a small lump for your first manuscript.  Shape it into a soft rectangle.


Using the blunt edge of a knife or a fondant or gum paste cutting tool, slice into the centre of the rectangle, approximately halfway through it.


Using a round pencil or another fondant tool for which I do not know the name, widen the incision and spread and smooth the pages on either side so that they resemble the wings of a bird if viewed from the bottom or top edge.  Trim the left and right edges of the manuscript at an angle to mimic the spread of the pages of an open book.
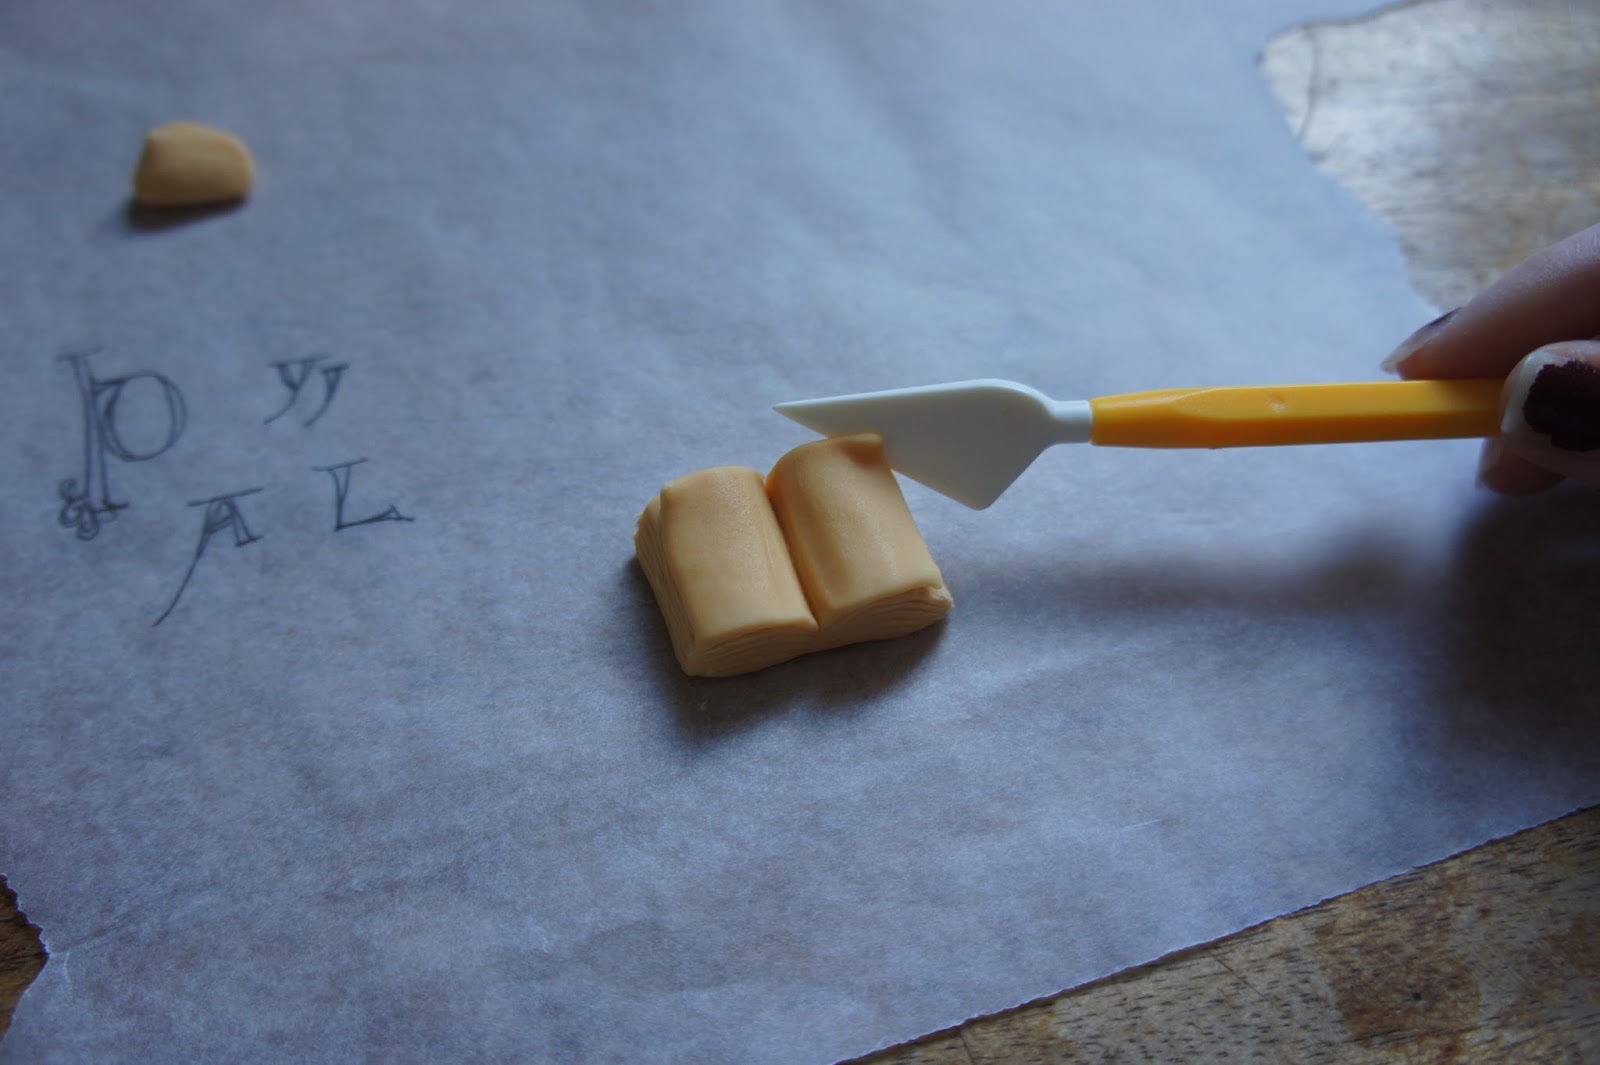

With the tip of the knife or cutting tool, draw the lines of individual pages into the top and bottom edges of the book, following the wing-shape you created.  On the right and left edges create the pages by pressing in with the length of the blade, rather than drawing the lines with the tip.  Turn up the corner of a page by gently sawing into it and lifting.


For the binding, roll out fondant of a different colour (I prefer black) and trim it to the size of your manuscript.  Round the corners a bit if desired, and create the spine by placing two indents on either side of the sheet using a toothpick.


To paint on the 'text', you will need a fine brush and more of the gel dye used to colour the fondant.  As I showed in the Black Book of Cake, to paint with these gels it is helpful to thin them out using a clear alcohol such as gin or vodka.  As the paint dries this will evaporate, so there's no worry if feeding the fondant to kids!  By thinning the dyes, it is possible to adjust the consistency and the transparency of your colours.  Having the alcohol and cotton swabs on hand is also helpful in the event that you make a mistake, because if you act quickly it is possible to wipe it off using an alcohol-soaked swab or paper towel.


Because I did not take photos throughout the process of making the first batch of manuscripts, I made one more to top off the bonus tiny cake I mentioned earlier; this is the manuscript featured in my step-by-step.  I painted this one slightly differently, in that I included both coloured initials and 'text' on the same page, rather than the sort of carpet pages I made in my thank you cupcakes.  The 'text' of all of the manuscripts I formed purely out of minims; there weren't enough hours in the day for the level of procrastination that it would have taken to copy true tiny texts into these miniscule manuscripts, and fortunately minim confusion is not an issue on pages that are going to be eaten...

Monday, 6 October 2014

... And Then the Flood

Continuing in the spirit of Great British Bake Off-inspired experimentation, I moved from a cake without any chemical leavening agents to a cake without any chemical leavening agents and without any flour.  No flour!  That's right all you gluten-free people out there.  It is not that there is a flour-substitute in this cake - there isn't.  It is made only with chocolate, sugar, water, butter, eggs and coffee.  Some flourless chocolate cakes use similar ingredients but are treated almost as souffles, with soft peak egg whites folded into the batter to raise the cake.  This results in a 'fallen' look to the top of the cake when it cools.  This cake, however, is not really leavened at all.  Something akin to a mousse is made through combining melted chocolate, butter and sugar with beaten whole eggs and coffee.  It is not folded into anything, however, and no heavy cream or gelatin is involved.  The batter is simply poured into the prepared pan and baked in a bain-marie.


I say 'simply', and it generally is, but please take more care than I did - there will be less stress in the end.  In order to easily remove the cake after baking, I used a springform pan.  I used two springform pans actually: a 9" for the cake and an 11" for the bain-marie.  I took care to line the inside of the larger pan with foil so that the water would not leak out of it.  I did not, however, line the outside of the smaller pan to keep the water from leaking in...

Fold pieces of foil several times in the centre to waterproof.

I chose this recipe from Nick Malgieri, or rather was given it by my sister, because it was the nearest version either of us knew to the flourless chocolate cake that we used to decorate in the bakery.  I adapted it to fill a 9" pan instead of an 8", and this version can be found in the Recipe Box, along with the salted caramel and whisky sauce (see below).

If the chocolate does not melt, reheat gently over a double boiler.

While I'd seen the cakes baked many times, and eaten them many times, I'd never actually made any myself; hence the experimentation.  I did remember that the bakery used esspresso in the cakes, so I got a double shot and mixed that with enough pour-over coffee to make a 1/4 cup.  I did not, however, remember the more important piece of information...

Let the coffee cool before whipping it into the eggs.

As I was lowering the cake into the bain-marie, and giving it a bit of a push into the water (I didn't think it should float - another genius move) I had visions of peeling foil off of the bottoms of the flourless chocolate cakes in the bakery.  'That's odd...', I started to think in the split second before the water began to gurgle up with increasing speed between the edge of the batter and the inside of the pan, before another leak sprung and then another.  The top of the cake had flooded before I could finish cursing.

Temper the eggs with a little bit of chocolate before combining.

I poured the water out and off of the cake as best as I could, and proceeded to put it in the oven with fingers crossed.  The oven was having heating issues as well, of course, requiring to be set at Gas Mark 5 despite the desired temperature being a mere 300F (150C); fortunately I had purchased a thermometer that morning.¹

Whip it all together...

When the timer went off, I held my breath, opened the oven and pulled out a cake submerged under a small lake.  More cursing.  I very nearly had my own personal bingate!  Instead, when trying to tip the cake over the sink (not into the rubbish) I noticed that it was holding together, so I changed tack and soaked up the water with paper towels, covered the top where it was dark and would have been at risk of burning, and put it back in the oven.  However long it was in there in the end, I couldn't say, but I removed it for good when I thought that it seemed set and the top a bit dry.

Not too bad, in spite of the flood.

While the cake was cooling, I set to making salted caramel and whisky sauce to cover up any less aesthetically-pleasing aspects of the cake.  Salted caramel whisky sauce also has the added benefit, of course, of being utterly and totally delicious.  But you can leave it off if you like, your call.


I made this caramel once before, but in its original calvados incarnation in a recipe from BBC Food.  This time I substituted whisky and added about a 1/4 tsp of coarse Breton sea salt (for a very Celtic sauce, I suppose).  I thought that the sauce might have needed a bit of reheating before serving, but it was fine at room temperature.  If left in the refrigerator overnight, however, prepare for it to be spreadable.


Not bad for gluten-free.

¹ It really make me wonder what I baked the last three cakes at, though...

Wednesday, 27 August 2014

Merlyn (with a 'y')

"When he had listened to all this, Merlin went up to the King and asked: 'Why have my mother and I been brought into your presence?' 'My magicians have advised me,' answered Vortigern, 'that I should look for a fatherless man, so that my building can be sprinkled with his blood and thus stand firm.'  'Tell your magicians,' answered Merlin, 'that they'd be better served pouring me into a cake.'"¹

It's true: sprinkling the fatherless Merlin's blood over the building would not have steadied its foundation one bit, because the real problem was caused by a pair of dragons fighting beneath an underground pool.  Which is to say: it's not true at all.  Clearly.  That last bit about the cake, however, is especially untrue in that I made it up rather than Geoffrey of Monmouth or Nennius (with whom this episode - minus the cake -  first originated).  Nevertheless, pouring Merlyn (with a 'y') in a cake is tasty tasty tasty.  It's not the stuff of prophecy, but maybe it should be.

Merlyn (with a 'y') is a cream liqueur made by the Welsh distillery Penderyn.  It is delightful straight, but because I'm a fan of putting booze in cake, I couldn't resist...  The liqueur is made with cream, so it took no stretch of the imagination to think that it might taste nice in a whipped cream.  And because I love whiskey and chocolate, I decided to make a chocolate cake.  It also didn't hurt that I already had cocoa powder, and since I was operating in an ill-equipped dormitory kitchen, primarily with leftover ingredients, catering to what I could do (whip cream) and could use (chocolate) was key.  I used the chocolate cake recipe in the Recipe Box, but substituted self-rising flour for plain flour + baking powder.  I did get a bit extravagant, though, buying an entire container of baking soda for this one cake.  After the success of the self-rising flour in my yogurt cake, I had thought that I could get away with omitting baking soda from a chocolate cake.  I tried it that same week, and I was wrong.  More on that another time, perhaps...


Because I was using a tall, 6" cake tin, I halved the original recipe.  I was also short on liquid measuring tools (I had none), and so had to estimate measurements for the oil, buttermilk, coffee and Merlyn.  Because Merlyn wasn't in the original recipe, I allowed for it by dividing the amount of coffee and devoting half of it to the booze.

Guesstimation is an art, not a science...

The student kitchen was also lacking a mixer of any description, but thankfully one of my flatmates had brought one along from home.  It was a manual hand mixer, and this was the first time I'd ever used one to make a cake.  Surely, in the days before electricity, they were very effective; but that didn't stop me from being slightly afraid of a shaky foundation from a loose whipped cream.  So I sprinkled some Merlyn over it... just kidding.  Instead, I purchased extra thick heavy cream, thinking that it would make for a naturally firm whipped cream.  When I opened the lid of the stuff, it was so thick that I was worried it wouldn't whip at all!  I could have turned the container upside down and it would have hung in there like an aging rock star clinging to his youth.  In the end all my fears were unfounded: after a small learning curve, the manual mixer did the job very well, and the whipped cream was thick and fluffy and the leftovers (I know, leftovers! Don't worry, they were eaten...) never deflated.


I used the manual mixer on the cake batter too, and despite the lack of measuring tools and the use of a possibly-questionable oven, it baked well.


To finish the cake, I wanted to cover it in ganache.  The recipe for ganache is also in the Recipe Box.  Normally I just use a store-brand bar (or several) of dark chocolate, but the local store didn't have any, so I went for a pair of large Cadbury Bournville chocolate bars.  Candy bar chocolate can sometimes have a waxy texture that isn't that desirable to begin with, but which also doesn't translate well into ganache - it can go grainy or be temperamental when melting.  I'm no doctor of chocolate, but I suspect that's something to do with some additive designed to stop candy bar chocolate from melting.


The Bournville chocolate, however, works well.  It is a bit softer than darker chocolate, so I added more of it to the cream than I might have otherwise - about a bar and a half total.

Chocolate ribbons just starting to form.

While the ganache was setting, I got going on setting up the rest of the cake: splitting the layers, whipping the cream... that's it really; this was a gloriously simple cake!


After the ganache had set, I spread some on the bottom layer of cake to test my suspicions that it wouldn't be thick enough to pour over the whole thing.  It was not liquid by any means, but it was at this point that I decided to add the extra half-bar of chocolate.  If the ganache has already cooled when you decide to add more chocolate, melt the chocolate on its own and stir it into the prepared ganache.  If the ganache has been stored in the refrigerator, let it reach room temperature or warm it up in the microwave before adding the melted chocolate to prevent it from freezing up.


Merlyn cake: surely the recipe was in the Liber Vetusissimus or somewhere.  Geoffrey probably just didn't have a sweet tooth.

¹Thorpe, trans., Geoffrey of Monmouth: The History of the Kings of Britain, p. 168, except for the bit about the cake.  There's some weird stuff in Geoffrey, especially in and around the Merlin material, but cake is not one of those things.

Sunday, 25 May 2014

Not So Dense After All

I promised recipes with almond, so here's another one!  It was my first attempt at baking scones, and while they were very light and fluffy, I almost felt as though they should have been a little more dense.  It seems to me that the best scones I've had had a little bit of weight to them - that being said, maybe I've just been fooled by the copious amounts of clotted cream and jam that I pile on top of them.


I used a basic recipe from BBC Food, and adapted it to include the almond extract and chocolate chips.  My version is in the Recipe Box.  Start by mixing the flour, baking powder and salt.  Next rub cold butter into this mix.  Cutting the cold butter into chunks will make rubbing it into the flour mix easier and faster, but take care not to melt all the butter into the flour while rubbing it in - it's the butter bits that will melt and form air pockets in the scones while they bake, making them airy.  As I write this I realize that I've just complained about this very quality, but do as I say, not as I do, or some other such adage...


Once you've rubbed in the butter, mix in the sugar, followed by the almond extract and the milk.  At a 1/4 tsp the almond flavour and scent was detectable but not powerful; if you want to emphasize the almond more I'd recommend increasing the amount to a 1/2 tsp.  The dough will be wet and sticky.  Turn it out onto a floured surface, and lightly knead in the chocolate chips.  I'd been wondering if I'd under-kneaded the dough and that accounted for the lightness of the scones, but upon checking some scone baking tips they are all pretty consistent about not over-kneading the dough, and that light and fluffy scones are the goal.  However, they also warn not to twist when cutting out the scones, and I definitely did that... but now I'm getting ahead of myself.  Once the dough has been kneaded, pat (it will probably be too sticky to roll) it out to about 3/4" thick, then cut out the scones.  I used the open end of a mug to cut mine, but you could similarly use a jar or a lid or a biscuit cutter if you have one.


The recipe should make 8-12 scones (I got 11).  Place the cut-out scones on a lightly-greased baking sheet, and if you wish to glaze them (it looks pretty) beat one egg and brush it over the scones using a pastry brush or paper towel.  The original recipe suggests milk as an alternative glaze, but I don't think this will give the same level of browning and sheen.


Bake at 425F (220C) for 12-15 minutes.  I took mine out right at 12 minutes and they looked perfect.


I've been a busy baking bee, because I also (unseasonally) made another simnel cake.  An update on that will be coming to a blog near you.*


* This blog.

Thursday, 23 January 2014

Perfectibaking

Maybe it was the man who invented a machine to find the perfect chocolate chip cookie.  Maybe it was learning about the chemistry behind these sweet treats.  Maybe it was just high time to forget the science and take a big bite through the crispy caramelized edge of an oven-fresh chocolate chip cookie and straight into its gooey melting centre.

I haven't made chocolate chip cookies in a surprisingly long time, and have had a wide range of success with my past batches.  One of my earliest baking memories, in fact, was making chocolate chip cookies.  It was a joint effort with my sister when we were being babysat, and our abilities were questionable at best.  Let's just say that our oven use was supervised, but our measuring wasn't... and salt does look a lot like sugar; Rochelle from Sport Relief Bake Off knows.  More recently I used a recipe from a Mrs. Fields' cookie cookbook, and loved them!  That's why this time I tried to find the same recipe online, leading me to Mrs. Fields' blog and her Blue Ribbon Chocolate Chip Cookies.

The recipe called for more chocolate than I had on hand (one bar) and for dark brown sugar when all I had was light.  So I adapted; I cut the recipe in half to offset the lack of chocolate (my waistline may also have thanked me) and, in an attempt to return some of the deeper caramel flavour, substituted one tablespoon of molasses for one tablespoon of the light brown sugar.  My adapted recipe is in the Recipe Box.


The recipe is very straightforward: whisk the dry ingredients in one bowl, cream the butter and sugar in another before adding the egg, molasses and vanilla, and then combine everything.  As with most recipes, over-mixing should be avoided.


After mixing, scoop out tablespoon-sized balls of dough, roll them up, and arrange them on the baking sheet.


I expected quite a bit of spread from the cookies - to be honest I thought they might have been one giant cookie when I took them out - but I took a chance and they were fine.  They spread at the start of the bake...


And then they puffed up.


They surprised me again when they didn't fall back down after I took them out of the oven... These were not the same cookies I'd made from the cookbook.  I don't know if that was because the base recipes were different, I checked the cookbook and the recipes are the same (thank you Mrs. Fields!), so it seems that either my method (ignoring the directions in the recipe or not ignoring them) changed, or the addition of molasses really made quite a difference.  I remember those initial cookies as being relatively flat, crispy on the outside and soft in the middle; the kind you could bend a bit without breaking.  This batch also bends without breaking, to a point, but are far thicker.  They aren't cakey or dry, but a bit crumbly in a good way.  The edges and surface have that carmelized sweetness, and the overall flavour is very nice.  I simply don't know what happened to give them their height; maybe it's my memory that's faulty.

I checked out this handy guide from Handle the Heat, but it didn't shed much light on my particular batch, as the only thick cookies she baked were the product of adding more flour to the recipe, which I didn't do.  She also reports that they were undercooked and gooey in the middle, which mine were not.  (That is, however, in line with what cookie machine guy suggested - see link above).  It seems like I'll just have to make them again - or a few more times - to experiment.  Darn.

Speaking of experiment, I made a discovery with this micro-batch of cookies: an ex-Balvenie canister holds one dozen of them, perfectly.


They aren't whisky, but they'll certainly do.