Showing posts with label cupcakes. Show all posts

Friday, 13 March 2015

Minim Confection

What do you give to someone to thank them for the wonderful gift of a phenomenal book?  Manuscript-themed cupcakes, of course!  At least this is the sensible course if the book is a manuscript facsimile.  That, and I may have been on a bit of a cupcake kick at the start of the year...


Because I'm a nerd, I wanted the cupcakes to spell out 'diolch am y lyfr' (Welsh for 'thanks for the book'), and my first thought was to cut out circles of fondant, paint them with a textura or gothic script and place them on top of smooth-topped cupcakes.  Fortunately I came to my senses and realized that mini fondant manuscripts would be so much cooler as toppers, so that's what I made.  I used initials, decorated with red for each new word, on the pages to spell out my message of thanks.


Admittedly, the cupcakes themselves are as much the superfluous part of this post as they were the superfluous part of the gift.  That being said, they were pretty good.  They were a variation on my whisky cake, in that the chocolate cupcakes were filled with chocolate and Guiness ganache and topped with whisky buttercream.  I used this recipe from Joy of Baking for the cupcakes, and be careful to note that the recipe makes sixteen cupcakes.  Since the average tray has a dozen cups, this could be a problem, and you should be prepared for it before it comes time to pour the batter.  Since I only have one cupcake tray, I poured the excess batter into two small greased and cocoa-powdered souffle dishes.  This meant that in the end I had two 3-4 inch cake layers going spare... perfect for a bonus tiny cake.  The cupcakes were generally nice although they came out somewhat fudgier than I might have liked; others liked the fudginess, so this is personal preference.  The only change that I made to the recipe was using hot coffee in place of hot water, because coffee strengthens the flavour of chocolate cake.  I may also not have mixed the hot coffee with the cocoa poweder - too much time has passed now to remember - and it might be this that resulted in said fudginess.  The cupcakes were also quite susceptible to cracking when coring them to fill with ganache, possibly for the same reason.  If you pipe the ganache into the centres of the cupcakes with a piping bag and do not use too much pressure, it should not be terribly problematic.  The recipe for the swiss buttercream is in the Recipe Box, just add whisky to taste, and the same goes for the recipe for ganache but adding Guiness to taste.


I did learn something valuable in making this ganache: how to fix a broken ganache.  I can safely say that I had never broken a ganache before (I must have been lucky), so when it happened I wasn't sure what I was looking at.  I had been unable to buy my preferred ganache-making chocolate, so my first instinct was to blame the lumpy, oily mess on low-quality chocolate.  I tried draining off the oil, reheating the mess, stirring and stirring and stirring, and it still looked gross.  I wondered if adding the Guiness had caused the problem, but since it was clearly oil sitting on top of the chocolate and not stout, that did not seem to be the issue.  Finally I googled  'broken ganache' and found Matthew Kayahara's blog, where he explained that a broken ganache is the result of an unbalanced fat-to-water ratio, with the fat content being too high.  To fix it, heat some low-fat milk and, very slowly, incorporate it into the ganache until everything comes together and it looks like the smooth chocolate confection it should be.  Where did bakers and chefs go for answers before google?  Medieval scrolls, I guess.


On to the manuscripts!  I knew how I wanted my books to look, and a vague idea of how to get there, but for tips I googled (again!) and found this how-to from A Grey Eyed Girl.  She provides a very good step-by-step, complete with pictures.  I used different tools, but followed her closely with variation in the details (turned up edges or corners of pages, thickness of the book, lift of the pages from the binding) for each manuscript.  I also coloured my fondant with a mix of red, yellow and black gel dyes, just as I did with my Black Book of Cake manuscript cake, to make it resemble vellum.


Colour a ball of fondant to your desired shade, and break off a small lump for your first manuscript.  Shape it into a soft rectangle.


Using the blunt edge of a knife or a fondant or gum paste cutting tool, slice into the centre of the rectangle, approximately halfway through it.


Using a round pencil or another fondant tool for which I do not know the name, widen the incision and spread and smooth the pages on either side so that they resemble the wings of a bird if viewed from the bottom or top edge.  Trim the left and right edges of the manuscript at an angle to mimic the spread of the pages of an open book.


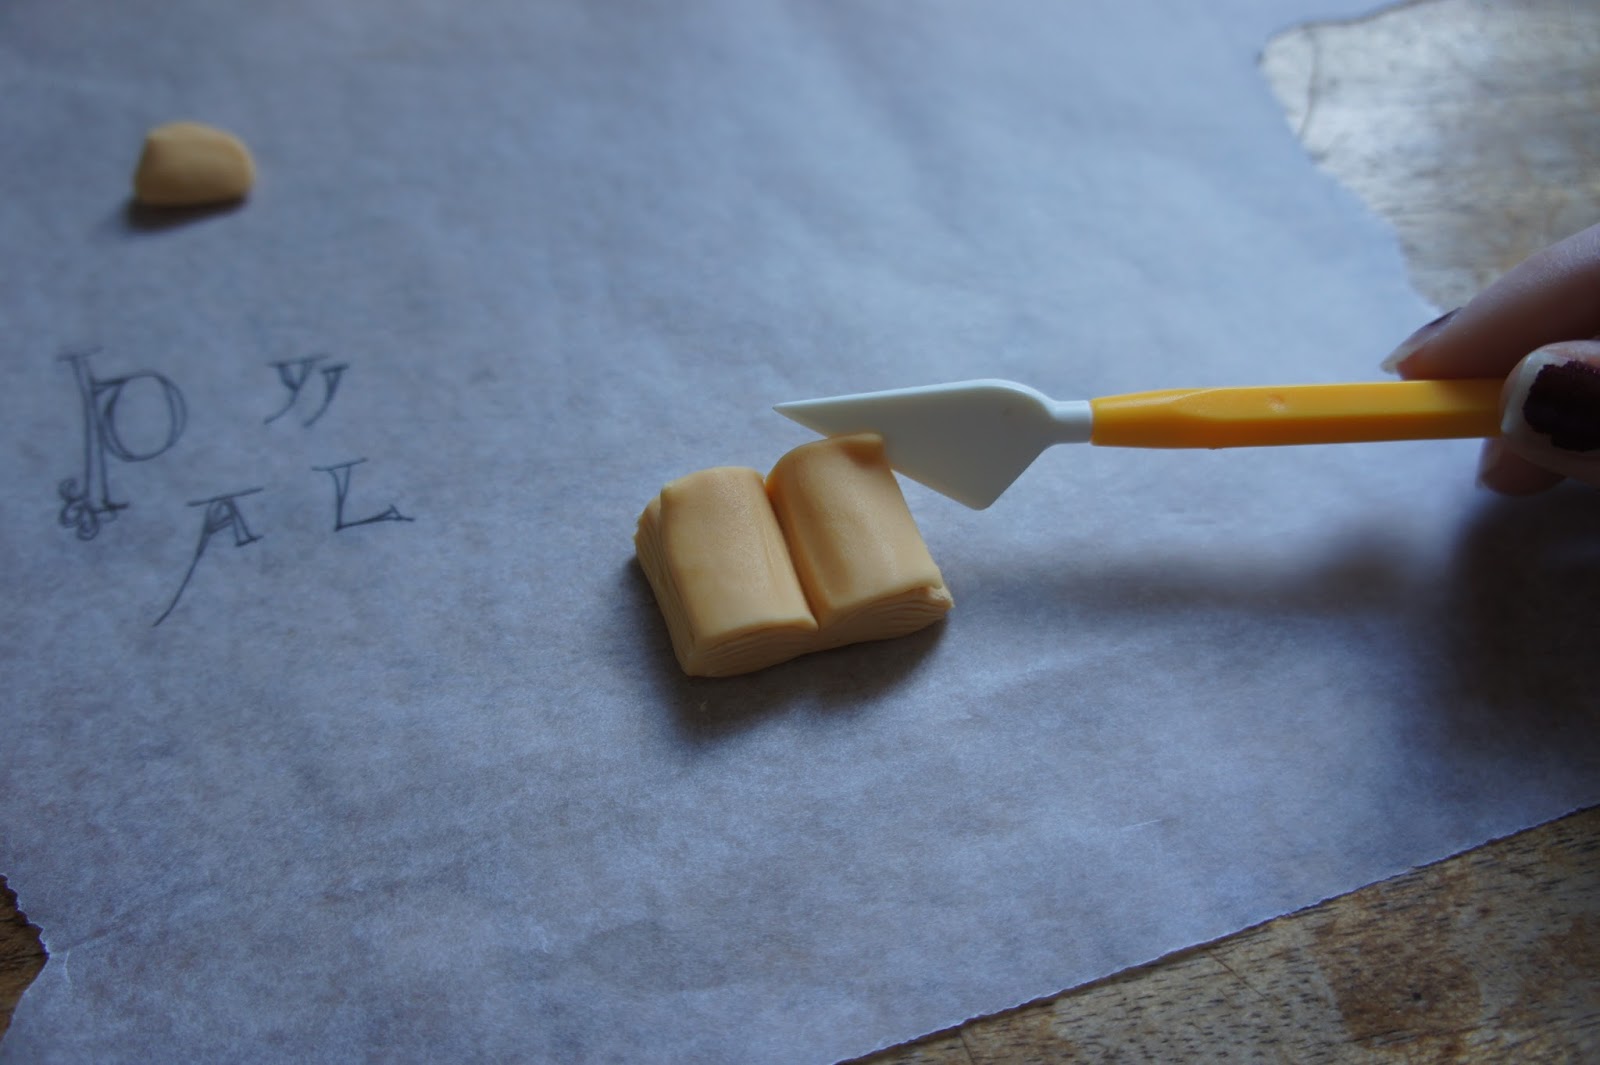
With the tip of the knife or cutting tool, draw the lines of individual pages into the top and bottom edges of the book, following the wing-shape you created.  On the right and left edges create the pages by pressing in with the length of the blade, rather than drawing the lines with the tip.  Turn up the corner of a page by gently sawing into it and lifting.


For the binding, roll out fondant of a different colour (I prefer black) and trim it to the size of your manuscript.  Round the corners a bit if desired, and create the spine by placing two indents on either side of the sheet using a toothpick.


To paint on the 'text', you will need a fine brush and more of the gel dye used to colour the fondant.  As I showed in the Black Book of Cake, to paint with these gels it is helpful to thin them out using a clear alcohol such as gin or vodka.  As the paint dries this will evaporate, so there's no worry if feeding the fondant to kids!  By thinning the dyes, it is possible to adjust the consistency and the transparency of your colours.  Having the alcohol and cotton swabs on hand is also helpful in the event that you make a mistake, because if you act quickly it is possible to wipe it off using an alcohol-soaked swab or paper towel.


Because I did not take photos throughout the process of making the first batch of manuscripts, I made one more to top off the bonus tiny cake I mentioned earlier; this is the manuscript featured in my step-by-step.  I painted this one slightly differently, in that I included both coloured initials and 'text' on the same page, rather than the sort of carpet pages I made in my thank you cupcakes.  The 'text' of all of the manuscripts I formed purely out of minims; there weren't enough hours in the day for the level of procrastination that it would have taken to copy true tiny texts into these miniscule manuscripts, and fortunately minim confusion is not an issue on pages that are going to be eaten...

Thursday, 12 March 2015

Bourbon Beans and Baking Problems

You may have a baking problem when, after going a few weeks without pulling something sweet-smelling out of the oven, people begin to ask questions.  Not only have I not been baking much lately, but I've been blogging about it even less.  In reality this is probably a good thing; less procrastibaking (at least in theory) means more working.  Nevertheless, I feel well overdue for a post or two, and I've got a bit of a backlog of bakes.  That, and I can't have the last post up be a commemoration of the time I blew chestnuts up all over my oven...

Back in January (so long ago now!) I baked some cupcakes.  Bourbon vanilla bean cupcakes with salted caramel buttercream, to be exact.  Cupcakes can be tedious little things, especially if you're making a few dozen of them and even more especially if they need to be decorated in any elaborate way.  They're small and fiddly, that's the nature of cupcakes.  These were not so bad, however, because I was only making one dozen and because they were going to be topped with buttercream leftover from a batch my sister had made and frozen.


I found a recipe for plain vanilla cupcakes on Joy of Baking, and adapted that to make them bourbon by replacing the milk in the recipe with - you guessed it! - bourbon.  My version of the recipe can be found in the Recipe Box.


Another reason that cupcakes are fiddly is that they are easy to over-bake and become dried out.  I've also had them inexplicably fall flat coming out of the oven, but fortunately there were no issues with these.  I set the timer a bit early at 15 minutes and checked them then, but they weren't quite ready.  By the low-end estimate of 17 minutes, however, they were good to go and I popped them out.  As with any cake, be careful not to over mix the batter, and try to pour them into the tray and get them in the oven with a bit of speed.


Let the cupcakes cool before icing them with the buttercream.  My sister had made swiss buttercream of the type that can be found in the Recipe Box, except that she used salted butter.  Salted buttercream can be very good on its own (as a flavour, not on a spoon... although to each his own), but I felt like adding something else to it - caramel.  Salted caramel is delicious, and with bourbon... yes.  Plus I had time to make caramel since I didn't actually have to make the buttercream.  For the caramel I used the recipe for Salted Caramel Whisky Sauce in the Recipe Box, but substituted bourbon for whisky.  I had left the buttercream out to defrost - and I should mention now that swiss buttercream does keep very well if you freeze it in ziploc bags or an airtight container - and once it was soft I beat it in the kitchen aid with a paddle attachment.  When it was at its smooth, light buttercream consistency, I continued to beat at a low speed and added caramel to taste.


I piped the buttercream onto the cooled cupcakes using a star tip, and then drizzled them with some of the leftover caramel sauce.  As a finishing touch, I sprinkled some demerara sugar on top.

Thursday, 30 January 2014

Great Chieftain o' the Puddin'-Race

I've been hoarding this recipe for a while now; since its creation, in fact.  It was the first cake I invented, and it's my favourite.  It earned two passing mentions on the local radio, and it was my claim to marginal fame.  I've been stubbornly reluctant to let it go, and yet all of its elements have been in the Recipe Box for a few months.

 
Born around the height of the Great Cupcake Fad, this cake actually began life in the form of the little cloud-topped, cup-shaped treats.  The basic components were chocolate cake, chocolate ganache and swiss buttercream, none of which is particularly unusual and all of which are easily translatable into a scrumptious layer cake.


The final component of my Whiskey Cake is the secret... You may be able to guess what it is.

Unsurprisingly, I wasn't even the first to think of putting whiskey in a chocolate cake: I was inspired by this recipe for Chocolate Irish Tipsy Cake that my mom once made for St. Patrick's Day.  It's quick, simple and delightfully delectable.  As much as I enjoy baking things from scratch, it can be hard to beat a simple box cake every now and again, and the addition of the instant pudding pack really gives the cake a ton of moisture.  Topped with this Hot Buttered Whiskey Glaze from Jack Daniel's, all I can say is - yum!


In a way, I can't give away the exact recipe for my cake because the recipe isn't exact.  I put whiskey in everything, but never in the same amount.  It's in the cake (pre-bake, substitute for part of the measurement of coffee, or other liquid such as water if called for), in the ganache and in the buttercream (you would think it wouldn't hold it, but it does).  For the latter two especially I use the pour-and-keep-pouring-til'-it-tastes-right method; let your taste buds be your guide  By the time it tastes right to me my olfactory senses are buzzing too...

I've always opted to use Irish whiskey (Jameson is great if it's on sale) because I'm not a huge fan of the smokey peat of Scotch whisky.  Last week, however, the idea was to honour the great Scottish bard Robert Burns, and so a Whisky (without the 'e' - trust me, it can be a touchy topic) Cake it had to be.

The most labour-intensive aspect of this cake is making the buttercream.  I've commented on it before here (and chocolate cake here and ganache here), but briefly: 1.) Beat a meringue to a stiff peak.


2.) When the meringue has cooled to room temperature, chop more unsalted butter than you ever want to think about or see and beat it into the meringue, a few pieces at a time,


3.) It'll look gross...


4.) Then it will look even worse...


But, 5.) If you and your hand mixer are able to power through it, the result - a light silky smooth buttercream - will be worth it.  Just don't think about the butter. 


(A side note: if you are lucky enough to have a stand mixer I'm sure I don't have to tell you to use that instead of a hand mixer, but make sure that you use the paddle attachment for the butter-beating; it will ensure far-fewer air bubbles, which is really what you want for a smooth surface on your cake).


Once the buttercream is finished, add your whiskey, and if you haven't put it in the ganache yet, throw some in there too.  For the cake itself, split your cake layers (best done after the layers have had a brief stint in the fridge or freezer), and spread a layer of ganache on each.  If your ganache hasn't set, you can try adding more melted chocolate (reheat the ganache a bit first so it doesn't freeze up) and cool it all again, or you can use a thin layer of moderately loose ganache and let it set on the layers in the freezer for a few minutes.  Once the layer of ganache is firm, spread a layer of buttercream on top.  Stack on the next cake layer and repeat until you get to the top layer, which should not have ganache on it.


Cover the cake with the remaining buttercream, pipe on borders or a design if desired, and enjoy!