Saturday, 27 August 2016

Christmas in July in August

After one year and eight months spent drinking, maturing and resting in a cool dark place, the cake's life of luxury had come to an end.  It was ready.  I'd missed two Christmases with this cake already, but nothing was going to stop me from having Christmas in July this year (yes, this is a thing - commercialised, it goes without saying).  I was moving, and who wants to lug around a weighty lump of confectionery in their hands when it could be done more easily in their stomach?  With the packing having also jostled my Christmas tree out of its hiding place, it was as if I'd waited one year and eight months on purpose.


A long, long time ago, way back in 2014, I'd been given a recipe for a traditional British Christmas Cake.  It was already November, and I was told by the recipe-giver that that was really too late to start preparing; the cake wouldn't be mature by Christmas.  Embracing the holiday spirit (and spirits) I went ahead and started anyway, setting the dried fruit to soak in some whiskey and imagining a non-traditional Christmas Cake feast at New Year's.  I'd already made some non-traditional fruit choices, opting to use cranberries and figs in the recipe in place of raisins and glacé cherries, so what was timing in the name of festive baking?  Little did I know how far off the timing - and the tradition - would become.

Fruit awaiting its whiskey bath.

It was fitting that this would be the last cake that I completed in the house, as it was also the first I baked there.  I'd been delighted to be living somewhere with a gas oven, and fool-hearty enough not to check if it was temperamental before baking anything special, let alone something with such a long bake time as a traditional Christmas Cake.  I learned, in due course, that the oven flame was open, and far too near to the centre rack for comfort.  There was also very poor circulation, leading to burned and uneven bakes.  This was a disappointment which I eventually remedied, much to the bemusement and confusion of my landlady (a topic for another post), but not in time to spare my Christmas Cake from becoming a bit singed.


The recipe that I used, even if I didn't follow it strictly, was from an old issue of Country Living magazine; my adaptation can be found in the Recipe Box.  It did not include the fruit-soaking step, though I found that Mary Berry recommends it (no surprise to Bake Off fans).  She says to soak for three days, I soaked for eight, tomayto tomahto.  Whenever you feel like your fruit has had enough, it's time to prepare the rest of the cake.  You'll want a deep, 8 or 9" pan, and it should be heavy - the only reason my cake wasn't burned to a fiery crisp was because I'd baked it in a nice solid pan (as I've promoted before).


For most of the cake preparation, it's standard procedure: the dry ingredients get whisked together, the sugar is creamed into the butter, etc.  One difference is that this recipe calls for honey, which is whipped into the eggs before being incorporated into the creamed butter.  It also includes a notable tip - applicable to any fruitcakes - to mix some of the flour mixture into the dried (soaked) fruit before stirring them into the rest of the batter; this keeps them from sinking to the bottom of the cake.  Because I had soaked the fruit in whisky, my tip is to include the excess alcohol from the soaked fruit in the two tablespoons the recipe calls for in the batter; this, I think, made a fruity, boozy cake even more fruity and boozy.


 After baking and cooling, I wrapped the cake in parchment paper and string and left it to mature in a cake tin.  At first I would open it every few days to feed it a dram, but this gradually became every few weeks and then every few months, as New Year's passed and, eventually, Christmas 2015 as well.

Looking a bit singed.

When I opened the tin in July, the spicy aroma of fruit and whisky filled the room with the power and speed of a half-dozen holiday scented candles.  Instant Christmas in July.  After nearly two years, all that remained to do apart from eating the cake was to cover it with marzipan.  In my haste I neglected to first lightly smother the top in marmalade or apricot jam, which would have added some moisture and another hit of flavour, but which was unnecessary for adhering the marzipan to the cake.  Because I'm not partial to the artificial flavour of some store-bought marzipan, I opted to take the messier route and make almond paste using ground almonds, confectioner's sugar and an egg white.  This is sticky business, and it is neither necessary nor endorsed by the recipe - nevertheless, the recipe for almond paste (I used one by The Daring Gourmet) can be found in the Recipe Box.  As when rolling out marzipan, when rolling almond paste it's best to dust the rolling surface (and the rolling implement) with confectioner's sugar to keep it from sticking (counter-intuitive, I know).  To measure the disc needed to cover the top of the cake, I lightly pressed the pan I'd used for baking into the rolled-out almond paste, and cut along that line with an offset spatula.  For a final, summery touch I used the leftover almond paste to make roses, which I arranged on top of the cake with some candied peel leftover from another, far more recent baking endeavor.

Out for a bi-monthly bath, c. 2015.

It's hard to say if the cake was worth the wait without knowing what it would have been like a year or even eight months ago.  My fear that it would be too dry, however, was unfounded.  Though it took a while to learn, 2014 was a good cake vintage, and it's only fitting that - like the cake itself - this post, too, would be a bit delayed.  Merry Christmas in July (in August).

Friday, 13 May 2016

Catching Up On Cake

Happy Friday the 13th!  It's been over a year since my last post, and though there's been more procrastibaking in that time than this blog would suggest, there has been - clearly and admittedly - less procrastiblogging.  As my last post was also on a Friday the 13th, an auspicious day, it seems high time to get the creative juices flowing...

... creative grapefruit juices, that is.  Summer looked like it might finally be setting in when I had a dinner party to bake for, and the warmer air and sunnier skies made me crave citrus.  I remembered that some time back a friend had suggested that I try making blood orange curd, but as I wasn't able to find any of the fruit in stores and the juice was quite expensive, this will have to remain an experiment for another day, perhaps when there's a sale on.  Still, I was looking for something different, and it occurred to me that while lemon and orange are go-to citruses for baking (and of course key lime if you're lucky enough to be able to get your hands on those little green gems - I miss key lime pie), grapefruit is rather underused.  I wanted to bake something simple, so had already thought about making a bundt cake (no messy layers), and once I decided on grapefruit the cake baking in my mind became a grapefruit pound cake.  Throw in some poppy seeds, and not only do you get added texture to the grapefruit twist, but also alliteration in 'pink grapefruit poppy seed pound cake'.


For the cake, I used this Epicurious recipe - substituting grapefruit zest of course - and doubled it because I like my bundt cakes to be tall (I used a 10" pan that's 4" deep).  To finish it, I made a grapefruit glaze following Martha's recipe for the lemon equivalent for this cake.  I used pre-squeezed juice for the glaze, and since I don't have a strainer I removed some of the pulp by running the juice through a pour-over paper coffee filter.  I'm not sure I'd recommend doing that; it wasn't terribly effective, and I think a pulpy glaze would've been just fine.  I thought I was being pretty clever with my combination, which is never a thought to have.  I say this because yesterday I stumbled across this recipe from BBC Good Food and for a split second thought I was losing my mind.  Ok two seconds, or the time it took me to check the publication date...


For once in my life, I'd actually finished the cake with time to spare, so while I was waiting I took my remaining grapefruit and peeled it with a paring knife to make a rose for the centre of the cake.  I essentially already knew how to do this, but nevertheless found this youtube tutorial to be a useful demonstration - it's probably best watched with the sound off if you want to avoid a sexist anecdote.  To hold the rose together for travel (I didn't want to insert the rose before pouring the glaze, which I did just before serving), I pinned it with a couple toothpicks.

Continuing with the theme of simple, summery cakes, this week I tried this Martha Stewart recipe for strawberry cake.  The idea of baking a cake in a pie dish was weirdly appealing, and as with the bundt cake - no layers!  I've also been scoping out the ruby-red berries that have been appearing in the market lately, and this recipe seemed as good an excuse as any for taking some home.  For as beautiful as they are in the box, I thought they'd look even better arranged on top of a sugary cushion of cake... and perhaps they would have if they hadn't all sunk to the bottom.

pre-bake

The only alteration I made to the recipe was multiplying it one and a half times to fill my deep dish pan.  As it turns out, the other alteration I should have made was flouring the cut sides of the berries before arranging them on the cake.  I'm not certain that this would have kept them from sinking entirely, but I suspect it might have made a difference; further investigation is warranted, and welcome considering how well the cake came out despite this small snafu.  It was an excellent afternoon pick-me-up with ice cream and coffee, but would be equally great for dessert, or even breakfast...


Friday, 13 March 2015

Minim Confection

What do you give to someone to thank them for the wonderful gift of a phenomenal book?  Manuscript-themed cupcakes, of course!  At least this is the sensible course if the book is a manuscript facsimile.  That, and I may have been on a bit of a cupcake kick at the start of the year...


Because I'm a nerd, I wanted the cupcakes to spell out 'diolch am y lyfr' (Welsh for 'thanks for the book'), and my first thought was to cut out circles of fondant, paint them with a textura or gothic script and place them on top of smooth-topped cupcakes.  Fortunately I came to my senses and realized that mini fondant manuscripts would be so much cooler as toppers, so that's what I made.  I used initials, decorated with red for each new word, on the pages to spell out my message of thanks.


Admittedly, the cupcakes themselves are as much the superfluous part of this post as they were the superfluous part of the gift.  That being said, they were pretty good.  They were a variation on my whisky cake, in that the chocolate cupcakes were filled with chocolate and Guiness ganache and topped with whisky buttercream.  I used this recipe from Joy of Baking for the cupcakes, and be careful to note that the recipe makes sixteen cupcakes.  Since the average tray has a dozen cups, this could be a problem, and you should be prepared for it before it comes time to pour the batter.  Since I only have one cupcake tray, I poured the excess batter into two small greased and cocoa-powdered souffle dishes.  This meant that in the end I had two 3-4 inch cake layers going spare... perfect for a bonus tiny cake.  The cupcakes were generally nice although they came out somewhat fudgier than I might have liked; others liked the fudginess, so this is personal preference.  The only change that I made to the recipe was using hot coffee in place of hot water, because coffee strengthens the flavour of chocolate cake.  I may also not have mixed the hot coffee with the cocoa poweder - too much time has passed now to remember - and it might be this that resulted in said fudginess.  The cupcakes were also quite susceptible to cracking when coring them to fill with ganache, possibly for the same reason.  If you pipe the ganache into the centres of the cupcakes with a piping bag and do not use too much pressure, it should not be terribly problematic.  The recipe for the swiss buttercream is in the Recipe Box, just add whisky to taste, and the same goes for the recipe for ganache but adding Guiness to taste.


I did learn something valuable in making this ganache: how to fix a broken ganache.  I can safely say that I had never broken a ganache before (I must have been lucky), so when it happened I wasn't sure what I was looking at.  I had been unable to buy my preferred ganache-making chocolate, so my first instinct was to blame the lumpy, oily mess on low-quality chocolate.  I tried draining off the oil, reheating the mess, stirring and stirring and stirring, and it still looked gross.  I wondered if adding the Guiness had caused the problem, but since it was clearly oil sitting on top of the chocolate and not stout, that did not seem to be the issue.  Finally I googled  'broken ganache' and found Matthew Kayahara's blog, where he explained that a broken ganache is the result of an unbalanced fat-to-water ratio, with the fat content being too high.  To fix it, heat some low-fat milk and, very slowly, incorporate it into the ganache until everything comes together and it looks like the smooth chocolate confection it should be.  Where did bakers and chefs go for answers before google?  Medieval scrolls, I guess.


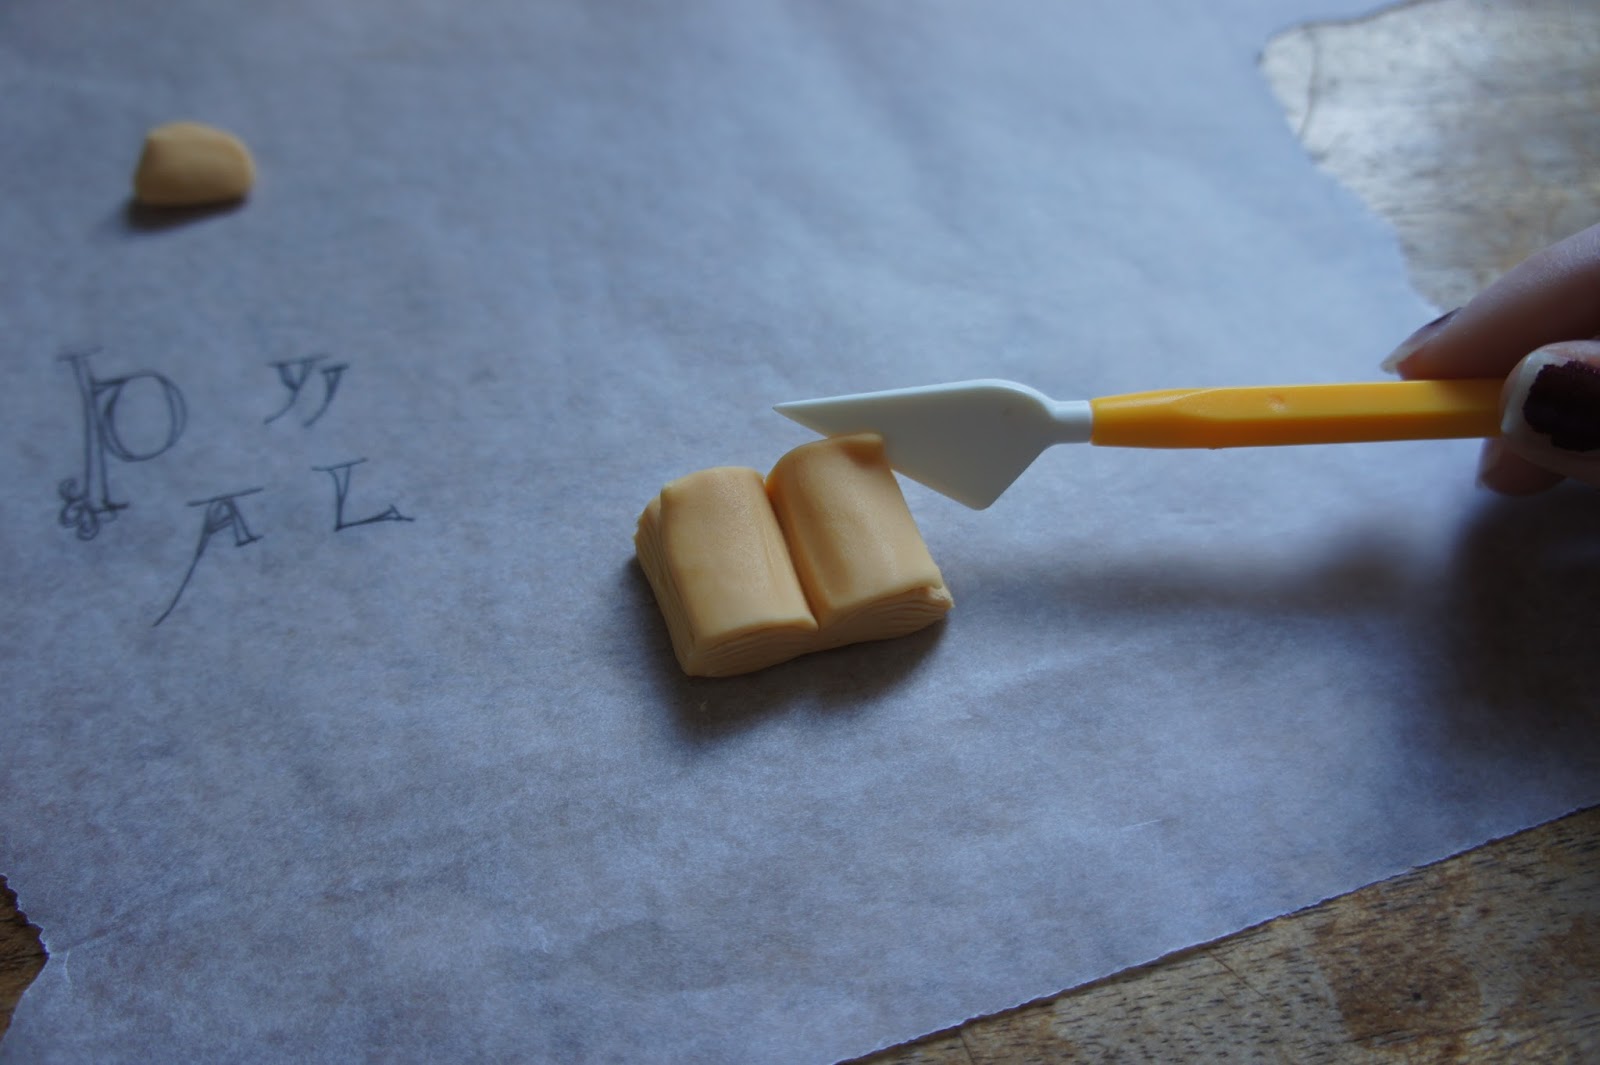
On to the manuscripts!  I knew how I wanted my books to look, and a vague idea of how to get there, but for tips I googled (again!) and found this how-to from A Grey Eyed Girl.  She provides a very good step-by-step, complete with pictures.  I used different tools, but followed her closely with variation in the details (turned up edges or corners of pages, thickness of the book, lift of the pages from the binding) for each manuscript.  I also coloured my fondant with a mix of red, yellow and black gel dyes, just as I did with my Black Book of Cake manuscript cake, to make it resemble vellum.


Colour a ball of fondant to your desired shade, and break off a small lump for your first manuscript.  Shape it into a soft rectangle.


Using the blunt edge of a knife or a fondant or gum paste cutting tool, slice into the centre of the rectangle, approximately halfway through it.


Using a round pencil or another fondant tool for which I do not know the name, widen the incision and spread and smooth the pages on either side so that they resemble the wings of a bird if viewed from the bottom or top edge.  Trim the left and right edges of the manuscript at an angle to mimic the spread of the pages of an open book.


With the tip of the knife or cutting tool, draw the lines of individual pages into the top and bottom edges of the book, following the wing-shape you created.  On the right and left edges create the pages by pressing in with the length of the blade, rather than drawing the lines with the tip.  Turn up the corner of a page by gently sawing into it and lifting.


For the binding, roll out fondant of a different colour (I prefer black) and trim it to the size of your manuscript.  Round the corners a bit if desired, and create the spine by placing two indents on either side of the sheet using a toothpick.


To paint on the 'text', you will need a fine brush and more of the gel dye used to colour the fondant.  As I showed in the Black Book of Cake, to paint with these gels it is helpful to thin them out using a clear alcohol such as gin or vodka.  As the paint dries this will evaporate, so there's no worry if feeding the fondant to kids!  By thinning the dyes, it is possible to adjust the consistency and the transparency of your colours.  Having the alcohol and cotton swabs on hand is also helpful in the event that you make a mistake, because if you act quickly it is possible to wipe it off using an alcohol-soaked swab or paper towel.


Because I did not take photos throughout the process of making the first batch of manuscripts, I made one more to top off the bonus tiny cake I mentioned earlier; this is the manuscript featured in my step-by-step.  I painted this one slightly differently, in that I included both coloured initials and 'text' on the same page, rather than the sort of carpet pages I made in my thank you cupcakes.  The 'text' of all of the manuscripts I formed purely out of minims; there weren't enough hours in the day for the level of procrastination that it would have taken to copy true tiny texts into these miniscule manuscripts, and fortunately minim confusion is not an issue on pages that are going to be eaten...

Thursday, 12 March 2015

Bourbon Beans and Baking Problems

You may have a baking problem when, after going a few weeks without pulling something sweet-smelling out of the oven, people begin to ask questions.  Not only have I not been baking much lately, but I've been blogging about it even less.  In reality this is probably a good thing; less procrastibaking (at least in theory) means more working.  Nevertheless, I feel well overdue for a post or two, and I've got a bit of a backlog of bakes.  That, and I can't have the last post up be a commemoration of the time I blew chestnuts up all over my oven...

Back in January (so long ago now!) I baked some cupcakes.  Bourbon vanilla bean cupcakes with salted caramel buttercream, to be exact.  Cupcakes can be tedious little things, especially if you're making a few dozen of them and even more especially if they need to be decorated in any elaborate way.  They're small and fiddly, that's the nature of cupcakes.  These were not so bad, however, because I was only making one dozen and because they were going to be topped with buttercream leftover from a batch my sister had made and frozen.


I found a recipe for plain vanilla cupcakes on Joy of Baking, and adapted that to make them bourbon by replacing the milk in the recipe with - you guessed it! - bourbon.  My version of the recipe can be found in the Recipe Box.


Another reason that cupcakes are fiddly is that they are easy to over-bake and become dried out.  I've also had them inexplicably fall flat coming out of the oven, but fortunately there were no issues with these.  I set the timer a bit early at 15 minutes and checked them then, but they weren't quite ready.  By the low-end estimate of 17 minutes, however, they were good to go and I popped them out.  As with any cake, be careful not to over mix the batter, and try to pour them into the tray and get them in the oven with a bit of speed.


Let the cupcakes cool before icing them with the buttercream.  My sister had made swiss buttercream of the type that can be found in the Recipe Box, except that she used salted butter.  Salted buttercream can be very good on its own (as a flavour, not on a spoon... although to each his own), but I felt like adding something else to it - caramel.  Salted caramel is delicious, and with bourbon... yes.  Plus I had time to make caramel since I didn't actually have to make the buttercream.  For the caramel I used the recipe for Salted Caramel Whisky Sauce in the Recipe Box, but substituted bourbon for whisky.  I had left the buttercream out to defrost - and I should mention now that swiss buttercream does keep very well if you freeze it in ziploc bags or an airtight container - and once it was soft I beat it in the kitchen aid with a paddle attachment.  When it was at its smooth, light buttercream consistency, I continued to beat at a low speed and added caramel to taste.


I piped the buttercream onto the cooled cupcakes using a star tip, and then drizzled them with some of the leftover caramel sauce.  As a finishing touch, I sprinkled some demerara sugar on top.

Friday, 21 November 2014

"Chest-nuts burst-ing, all over the ovennnn..."

'Twas the night before Bake Off, when all through the house,
one baker was stirring, cocoa all over her blouse.
The parchment was lined in the cake pan with care,
in hopes that the batter would soon be in there.

When out of the oven sounded such a loud bang,
that the bowl nearly fell to the floor with a clang!
Away to the oven I flew like a flash,
threw open the door and had all my hopes dashed.

A great wave of heat rushed up into my eyes,
yet not from that sprung the tears, but from the surprise.
The walls of the oven showed I was a clutz:
splattered bits everywhere, in place of chestnuts.


I apologize, I don't know what happened there.  I need to get out more.  As is probably now clear, despite hearing Nat King Cole croon about chestnuts annually, I had next to zero familiarity with the shiny brown nuts prior to my blowing them up.  What possessed me, then, to want to bake a chestnut coffee cake, I do not know.  It was, in fact, the night of the Bake Off finale in early October, but I was already feeling a touch of holiday spirit.  So when I saw Bon Appétite's recipe for Chestnut Coffee Cake earlier on in the day, it grabbed my attention.  Never mind that I didn't know how to handle chestnuts, it couldn't be that hard, right?


I bought some lovely-looking nuts from the local market and took them home to get started.  The recipe calls for nuts in a vacuum-pack or a jar, but while I'd seen some in a can in the grocery store I hadn't seen any others.  Since fresh ones were available I thought they'd be best, plus I wanted to try roasting them first (not called for in the recipe) and wasn't sure about trying to roast chestnuts which had already been peeled, such as those in the can.  What I didn't think about was the possibility of rotten nuts.  Or blowing them up.


Of course, I knew the scoring of the nuts, as directed by BBC Food, was to allow for expansion; I expected the skins to open up, but for some reason it never occurred to me that they might start popping like popcorn.  So I scored them and put them in the oven to roast, uncovered.  The bang like the shot of a gun in the corner of the kitchen caught me totally off guard, and the mess inside... it wasn't pretty.  Only one nut had burst, but it had done so with gusto, coating the entire inside of the oven - top, bottom and sides - with a soft powder of chestnut guts.

I pulled the hot roasting pan from the oven and let the nuts cool while I aired out and cleaned out the oven.  By the time that was finished and I was no longer worried about any of the remaining chestnuts exploding in my face, I investigated them.  Some seemed ready to be peeled, but a number of them were discoloured inside.  I'd happened upon advice in another recipe to over-buy chestnuts because they often have rotten centres.  Without knowing what exactly a rotten centre looked like, or how to tell if my chestnuts were bad, I ran out and bought the canned variety.  It's never worth risking making people sick, and this cake wasn't just for me.


The canned variety come suspended in some sort of thick liquid, so I rinsed them off and then stuck them in to roast very very briefly before chopping them up.  The chopped nuts are then (or first, if you skip the roasting) cooked in a skillet with water and brown sugar to make a syrup.  The recipe calls for a half-cup of chestnuts, but I believe I might actually have gone a little crazy with the chestnut chopping (revenge therapy for the chestnut exploding?) and ended up using a full cup; if so I would also have doubled the water and sugar, as well as the cocoa and remaining sugar for coating.


There were a lot of nuts.  I let those cool while making the streusel topping.  This, unlike the nut fiasco, was very straightforward: simply mix almond meal, sugar, flour and salt and work the chunks of butter into it with your hands.  The cake recipe itself is very easy and fairly standard, with the inclusion of sour cream.  After the batter was made, I worked pretty quickly to get half of it in the pan and then to crumble a layer of the cocoa-coated chestnuts over it before topping it off with the second half of the batter and finally the streusel.


The recipe says to sprinkle the chestnuts over the first layer of batter, but mine were pretty sticky and thick, and not really sprinkle material...  I also had twice the amount, so rather than a chestnut here and a chestnut there, I wound up with an entire layer's worth.  In the end I quite liked it that way.


Unfortunately, even after my fallen cake and my flooded cake, I was still adjusting to my new oven (I still am, in fact), and one side got a little to near to the flame in the back.  Open fires, huh?  So it was singed and certainly wouldn't have won me any star baker accolades, but it was far from inedible.  Having had, as I mentioned, no previous experience with chestnuts I was surprised to find that they were meaty, but they really do work with the chocolate and the somewhat crumbly spongy texture of the coffee cake.  It was good for enjoying with friends (and their goodies!) during the finale of Bake Off, and a leftover slice was equally tasty with coffee the next morning.

Monday, 6 October 2014

... And Then the Flood

Continuing in the spirit of Great British Bake Off-inspired experimentation, I moved from a cake without any chemical leavening agents to a cake without any chemical leavening agents and without any flour.  No flour!  That's right all you gluten-free people out there.  It is not that there is a flour-substitute in this cake - there isn't.  It is made only with chocolate, sugar, water, butter, eggs and coffee.  Some flourless chocolate cakes use similar ingredients but are treated almost as souffles, with soft peak egg whites folded into the batter to raise the cake.  This results in a 'fallen' look to the top of the cake when it cools.  This cake, however, is not really leavened at all.  Something akin to a mousse is made through combining melted chocolate, butter and sugar with beaten whole eggs and coffee.  It is not folded into anything, however, and no heavy cream or gelatin is involved.  The batter is simply poured into the prepared pan and baked in a bain-marie.


I say 'simply', and it generally is, but please take more care than I did - there will be less stress in the end.  In order to easily remove the cake after baking, I used a springform pan.  I used two springform pans actually: a 9" for the cake and an 11" for the bain-marie.  I took care to line the inside of the larger pan with foil so that the water would not leak out of it.  I did not, however, line the outside of the smaller pan to keep the water from leaking in...

Fold pieces of foil several times in the centre to waterproof.

I chose this recipe from Nick Malgieri, or rather was given it by my sister, because it was the nearest version either of us knew to the flourless chocolate cake that we used to decorate in the bakery.  I adapted it to fill a 9" pan instead of an 8", and this version can be found in the Recipe Box, along with the salted caramel and whisky sauce (see below).

If the chocolate does not melt, reheat gently over a double boiler.

While I'd seen the cakes baked many times, and eaten them many times, I'd never actually made any myself; hence the experimentation.  I did remember that the bakery used esspresso in the cakes, so I got a double shot and mixed that with enough pour-over coffee to make a 1/4 cup.  I did not, however, remember the more important piece of information...

Let the coffee cool before whipping it into the eggs.

As I was lowering the cake into the bain-marie, and giving it a bit of a push into the water (I didn't think it should float - another genius move) I had visions of peeling foil off of the bottoms of the flourless chocolate cakes in the bakery.  'That's odd...', I started to think in the split second before the water began to gurgle up with increasing speed between the edge of the batter and the inside of the pan, before another leak sprung and then another.  The top of the cake had flooded before I could finish cursing.

Temper the eggs with a little bit of chocolate before combining.

I poured the water out and off of the cake as best as I could, and proceeded to put it in the oven with fingers crossed.  The oven was having heating issues as well, of course, requiring to be set at Gas Mark 5 despite the desired temperature being a mere 300F (150C); fortunately I had purchased a thermometer that morning.¹

Whip it all together...

When the timer went off, I held my breath, opened the oven and pulled out a cake submerged under a small lake.  More cursing.  I very nearly had my own personal bingate!  Instead, when trying to tip the cake over the sink (not into the rubbish) I noticed that it was holding together, so I changed tack and soaked up the water with paper towels, covered the top where it was dark and would have been at risk of burning, and put it back in the oven.  However long it was in there in the end, I couldn't say, but I removed it for good when I thought that it seemed set and the top a bit dry.

Not too bad, in spite of the flood.

While the cake was cooling, I set to making salted caramel and whisky sauce to cover up any less aesthetically-pleasing aspects of the cake.  Salted caramel whisky sauce also has the added benefit, of course, of being utterly and totally delicious.  But you can leave it off if you like, your call.


I made this caramel once before, but in its original calvados incarnation in a recipe from BBC Food.  This time I substituted whisky and added about a 1/4 tsp of coarse Breton sea salt (for a very Celtic sauce, I suppose).  I thought that the sauce might have needed a bit of reheating before serving, but it was fine at room temperature.  If left in the refrigerator overnight, however, prepare for it to be spreadable.


Not bad for gluten-free.

¹ It really make me wonder what I baked the last three cakes at, though...