I was never a Girl Scout, or a Campfire Girl. My family weren't campers. I never cared; I'm a diehard fan of indoor plumbing. As a result of this indoorsyness, however, I've come to associate s'mores not with a campfire, but with the barbeque. It never occurred to me before that this might be weird, that not every family always made s'mores when they barbequed, but in thinking about this post I started to wonder... Wikipedia (that font of infallible knowledge) doesn't mention barbequing in its entry for s'mores, but I'm not sure if the absence of evidence (or more specifically, the absence of Wikipedia commentary on the matter), is really evidence in itself for my family's habits being strange. No worries though, plenty of other evidence for that. But I digress. The point is that when I was recently invited to a barbeque, it only made sense (to me) that the cake I would inevitably bring as my contribution should involve s'mores.
While working at the bakery I made a special-order cake decorated with marshmallows and graham crackers, but inside it was just vanilla cake layered with chocolate ganache. This time I wanted to make a cake that actually tasted of s'mores. My first thought was to make a cinnamon cake such as this one to give the impression of graham crackers, but when I got a box of the cookies it claimed honey as one of their primary flavours. It was at that point that it occurred to me to see if there were any recipes for graham cracker cake out in the ether of the internet, and I learned that graham cracker cakes evidently enjoyed a degree of popularity back in the day (I'm not certain about when 'the day' was exactly, but I suspect it was the 50's or earlier). Who knew?
I looked at several different recipes, but they were all fairly similar in that each involved using crushed graham cracker in place of most of the flour, and a meringue to raise the cake. I chose this recipe from Allrecipes because it had the most reviews, all of which were largely positive, with the few complaints essentially boiling down to the involvement of a meringue. Sure, meringues can be tricky at first, but what better excuse to practice them than cake? (Or lemon meringue pie... or meringue cookies...). The first step though is crushing the graham crackers.
Combine these with the other dry ingredients: flour, baking soda, salt and, in the original recipe, ground pecans. I'm not 100% certain if these are added for flavour or texture, but I want to lean towards the latter... I had plans to replace them with extra graham cracker because I thought there was no hope of securing them without going to a health food store and paying a fair bit of money, but on a whim I checked in the local grocery store and, much to my surprise, they had ground almonds. Ground almonds it was! Once the dry ingredients have been combined, cream the butter and brown sugar. (Now I stumble on a recipe that does that! I still maintain that it doesn't really get fluffy though, not in the same way as granulated sugar and butter).
Add the yolks and vanilla, and then on to the meringue, which (in a separate bowl) should be beaten to a soft peak.
Then cut that into the batter. I should mention that, yes, the batter looks pretty unpleasant. Fortunately that is no reflection on the taste, but as a result you may want to save this particular treat for another time if you've recently had a sick pet or too much fun on a night out... it might bring back bad memories.
Be careful not to deflate the meringue when mixing, or when pouring the batter into the pre-greased, floured and lined pans.
A note on the pans: the recipe calls for 9" pans, mine were 8". I've never had an issue ignoring that kind of discrepancy in pan size before, but I guess when you play with cake batter, you're going to get... sticky? Well I didn't, the oven did, but anyway. Use 9" pans. When those have finished baking (350F for about 25 minutes) and cooling, freeze them overnight so the layers are easier to split and frost. (Frozen cake is always easier to deal with - fewer crumbs and less chance of it falling apart - and that's not specific to this recipe).
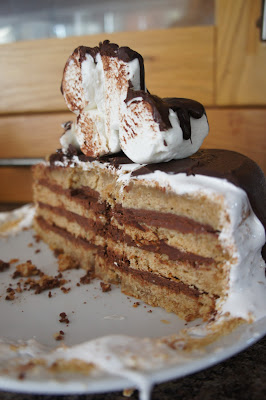
I layered the cake with chocolate ganache (find the recipe in the recipe box) that I had prepared the same night and left in the refrigerator. You want it to be thick bordering on solid, but workable. If it seems too hard just work it a bit with a spatula before spreading it on the layers.
After layering the cake, I frosted it with marshmallow fluff. You can make marshmallow fluff at home, but as it happened to be available in the store I just bought it; two jars to be on the safe side, although in the end one was enough.
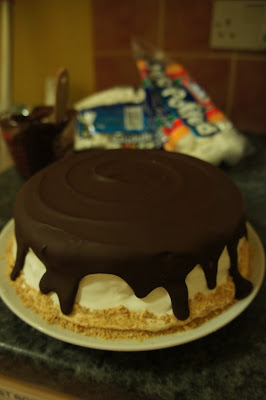
I half suspected that I was going to have a problem with the fluff melting, and my sister had already told me that fluff doesn't like refrigeration (it melts there too, but probably because of ambient moisture rather than temperature), so I'd performed some very precise (no not really) experimentation ahead of time. The results? Fluff melts at room temperature, stiffens when frozen, and holds its shape (somewhat, and not indefinitely) when covered in chocolate. The plan? Frost the cake, freeze it, cover it with melted chocolate, freeze it again.
Yeah. I knew I'd have some problems.
The fluff spread as it was freezing, but once stiff I re-straightened the sides with an offset spatula greased with a bit of shortening so that it would glide over the fluff, rather than pull it off. (This was my mom's suggestion, and it worked quite well. A fair amount of pressure was necessary to push the frozen fluff back up the sides of the cake, and I don't think it would have been possible without the grease). On top of that I added another layer of fluff to even out the bumps that had formed over the cake layers, and repeated the freezing and smoothing process. (I really should have smoothed the sides out with a layer of ganache before ever putting on the fluff, but oh well). Then I added some crushed graham crackers around the bottom edge, primarily for decorative border reasons, but also because I had the deluded hope that they might help support the fluff.
Next I melted a 300g bar of dark chocolate and poured it over the frozen cake. I melted the chocolate in the microwave rather than a double boiler, and while this can more easily lead to burning and/or seizing, as long as you chop the chocolate fairly finely and microwave in short increments (maybe 20 seconds), stirring in between, it shouldn't be a problem. Stirring is the key; once the better part of the chocolate is melted, stirring alone will take care of the rest.
I froze it again (as seen above - this cake sure spends a lot of time on ice for something based on a confection that's meant to be roasted), and then topped it off with a pile of marshmallows (which, surprise, I froze) and drizzled chocolate on them as well.
Here's the glamour shot before it melted:
It just about made it to the barbeque intact, and thankfully it didn't sit around there for long.
The bit that was left out for a more extended period did experience a pretty severe melting and sliding of fluff, so while the fluff was far better than buttercream for making a cake that tastes like a s'more, I may have to reconsider how to use it in future. Or just eat the cake faster. That would work.


No comments:
Post a Comment