Sunday, 28 July 2013

Cake Ballin'

In this episode I'll cut the rambling and get to the baked goods: calvados cake balls.  Cake balls are simply cake pops minus the sticks, and despite what late-night tv infomercials (my favourite part is where you start with cake mix and 'add kids') or assorted baking stores might try to sell you, you don't need a special tray (or kids) to make them.

Real cake pops are not baked, but rather are truffle-like balls normally made by crumbling cake and combining it either with cream cheese frosting, or, for something not quite so sweet, plain cream cheese (the haters at The Huffington Post might try this).  In this case, however, I decided to experiment with using mascarpone cheese because I thought the flavour would provide a nice compliment to the calvados, and also that it might make for a lighter cake ball.  Well, the calvados cake balls with mascarpone didn't get me any dates at the pub post-play (a very enjoyable outdoor performance of Much Ado About Nothing), but they did get good reviews, including a silent 'oh wow that's good', mouthed by an actress who had stolen one from our picnic spread mid-scene.  (Sure, her theft was a diversionary tactic, but still, I'll take what claims to fame I can get!).

Sorry, it seems I'm not great at not rambling.  I tried.

Here's the cake.

Step 1:  Bake a vanilla cake.  You can make a box cake (just add eggs and oil, no kids required), or whatever recipe you like.  I made the Versatile Vanilla again.


And don't forget to run a quality control check.  Very important.

Step 2:  Crumble the cake.


Cake balls (or pops) are an excellent way to use up leftover cake ('There's no such thing!' you argue, but let me finish) if, for example, you've baked two rounds but are only making a three layer cake (although if you'd rather just eat that fourth layer yourself, you'll find no judgement here).  They're also a good way to make use of cake that has burned (cut off the bad bits) or is stale, because the cream cheese (etc.) adds plenty of moisture.  Cake balls are the French toast or Welsh rarebit of the cake world.

Step 3:  Mix in calvados to taste.  (Feel free to quality control that too).

Step 4:  Add mascarpone.  (And maybe more calvados).


Step 5:  Beat until the crumb mixture comes together and begins to resemble a dough.


Step 6:  Roll into balls and place on a tray or baking sheet.


Place tray in the freezer.

Step 7:  When the cake balls are frozen, chop and melt dark chocolate.  Don't forget, if melting chocolate in the microwave do so in short bursts (approximately 10-15 seconds, depending on microwave settings), stirring in the intervals.

Step 8:  Using a skewer or fork, dip the cake balls in the chocolate, allow the excess chocolate to drip off, and return to the tray to set.  You may need to re-warm the chocolate during this process.  Once all the balls have been dipped I like to return the tray to the freezer, but you could also stick them in the refrigerator.


Step 9:  Consume!  Or if you're feeling generous, pack them up to share.


Monday, 22 July 2013

S'more Procrastibaking

I was never a Girl Scout, or a Campfire Girl.  My family weren't campers.  I never cared; I'm a diehard fan of indoor plumbing.  As a result of this indoorsyness, however, I've come to associate s'mores not with a campfire, but with the barbeque.  It never occurred to me before that this might be weird, that not every family always made s'mores when they barbequed, but in thinking about this post I started to wonder...  Wikipedia (that font of infallible knowledge) doesn't mention barbequing in its entry for s'mores, but I'm not sure if the absence of evidence (or more specifically, the absence of Wikipedia commentary on the matter), is really evidence in itself for my family's habits being strange.  No worries though, plenty of other evidence for that.  But I digress.  The point is that when I was recently invited to a barbeque, it only made sense (to me) that the cake I would inevitably bring as my contribution should involve s'mores.

While working at the bakery I made a special-order cake decorated with marshmallows and graham crackers, but inside it was just vanilla cake layered with chocolate ganache.  This time I wanted to make a cake that actually tasted of s'mores.  My first thought was to make a cinnamon cake such as this one to give the impression of graham crackers, but when I got a box of the cookies it claimed honey as one of their primary flavours.  It was at that point that it occurred to me to see if there were any recipes for graham cracker cake out in the ether of the internet, and I learned that graham cracker cakes evidently enjoyed a degree of popularity back in the day (I'm not certain about when 'the day' was exactly, but I suspect it was the 50's or earlier).  Who knew?

I looked at several different recipes, but they were all fairly similar in that each involved using crushed graham cracker in place of most of the flour, and a meringue to raise the cake.  I chose this recipe from Allrecipes because it had the most reviews, all of which were largely positive, with the few complaints essentially boiling down to the involvement of a meringue.  Sure, meringues can be tricky at first, but what better excuse to practice them than cake?  (Or lemon meringue pie... or meringue cookies...).  The first step though is crushing the graham crackers.


Combine these with the other dry ingredients: flour, baking soda, salt and, in the original recipe, ground pecans.  I'm not 100% certain if these are added for flavour or texture, but I want to lean towards the latter...  I had plans to replace them with extra graham cracker because I thought there was no hope of securing them without going to a health food store and paying a fair bit of money, but on a whim I checked in the local grocery store and, much to my surprise, they had ground almonds.  Ground almonds it was!  Once the dry ingredients have been combined, cream the butter and brown sugar.  (Now I stumble on a recipe that does that!  I still maintain that it doesn't really get fluffy though, not in the same way as granulated sugar and butter).


Add the yolks and vanilla, and then on to the meringue, which (in a separate bowl) should be beaten to a soft peak.


Then cut that into the batter.  I should mention that, yes, the batter looks pretty unpleasant.  Fortunately that is no reflection on the taste, but as a result you may want to save this particular treat for another time if you've recently had a sick pet or too much fun on a night out... it might bring back bad memories.


Be careful not to deflate the meringue when mixing, or when pouring the batter into the pre-greased, floured and lined pans.


A note on the pans: the recipe calls for 9" pans, mine were 8".  I've never had an issue ignoring that kind of discrepancy in pan size before, but I guess when you play with cake batter, you're going to get... sticky?  Well I didn't, the oven did, but anyway.  Use 9" pans.  When those have finished baking (350F for about 25 minutes) and cooling, freeze them overnight so the layers are easier to split and frost.  (Frozen cake is always easier to deal with - fewer crumbs and less chance of it falling apart - and that's not specific to this recipe).

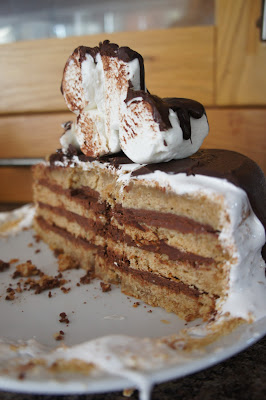
I layered the cake with chocolate ganache (find the recipe in the recipe box) that I had prepared the same night and left in the refrigerator.  You want it to be thick bordering on solid, but workable.  If it seems too hard just work it a bit with a spatula before spreading it on the layers.


After layering the cake, I frosted it with marshmallow fluff.  You can make marshmallow fluff at home, but as it happened to be available in the store I just bought it; two jars to be on the safe side, although in the end one was enough.

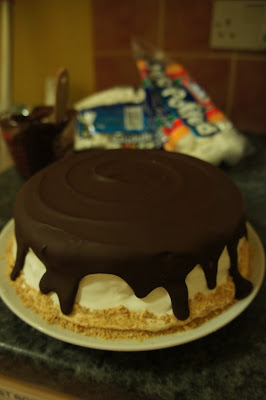
I half suspected that I was going to have a problem with the fluff melting, and my sister had already told me that fluff doesn't like refrigeration (it melts there too, but probably because of ambient moisture rather than temperature), so I'd performed some very precise (no not really) experimentation ahead of time.  The results?  Fluff melts at room temperature, stiffens when frozen, and holds its shape (somewhat, and not indefinitely) when covered in chocolate.  The plan?  Frost the cake, freeze it, cover it with melted chocolate, freeze it again.


Yeah.  I knew I'd have some problems.

The fluff spread as it was freezing, but once stiff I re-straightened the sides with an offset spatula greased with a bit of shortening so that it would glide over the fluff, rather than pull it off.  (This was my mom's suggestion, and it worked quite well.  A fair amount of pressure was necessary to push the frozen fluff back up the sides of the cake, and I don't think it would have been possible without the grease).  On top of that I added another layer of fluff to even out the bumps that had formed over the cake layers, and repeated the freezing and smoothing process.  (I really should have smoothed the sides out with a layer of ganache before ever putting on the fluff, but oh well).  Then I added some crushed graham crackers around the bottom edge, primarily for decorative border reasons, but also because I had the deluded hope that they might help support the fluff.


Next I melted a 300g bar of dark chocolate and poured it over the frozen cake.  I melted the chocolate in the microwave rather than a double boiler, and while this can more easily lead to burning and/or seizing, as long as you chop the chocolate fairly finely and microwave in short increments (maybe 20 seconds), stirring in between, it shouldn't be a problem.  Stirring is the key; once the better part of the chocolate is melted, stirring alone will take care of the rest.


I froze it again (as seen above - this cake sure spends a lot of time on ice for something based on a confection that's meant to be roasted), and then topped it off with a pile of marshmallows (which, surprise, I froze) and drizzled chocolate on them as well.

Here's the glamour shot before it melted:


It just about made it to the barbeque intact, and thankfully it didn't sit around there for long.


The bit that was left out for a more extended period did experience a pretty severe melting and sliding of fluff, so while the fluff was far better than buttercream for making a cake that tastes like a s'more, I may have to reconsider how to use it in future.  Or just eat the cake faster.  That would work.

Sunday, 7 July 2013

Excuses Excuses

Excuses aren't strictly necessary for cake (eating it or baking it, in my opinion).  Nevertheless, I had one for my mocha almond marble cake: I ran out of ice cream.  If we're fairly like-minded (and if you're bothering to read this, we probably are), you may be nodding in agreement and thinking 'Ah yes, a dire situation'.  Alternatively, you may be thinking that this is the least sensible reasoning you've encountered this week (in which case I'd say you're having a good week!).  In the event that you're thinking the latter, never fear, I have an excuse for my excuse: to obtain more ice cream I would have had to get dressed and go to the store, whereas to obtain cake, I only had to bake it.  No need to get out of my pyjamas.  (I should note that I am taking for granted two things here: 1., that pyjamas aren't clothes, even in the grocery store, and 2., that any evening spent at home requires dessert.  I hope that you'll agree with at least one of these two statements*).

I've reached a point in my life where, small as my cupboard is, it almost always contains all of the ingredients necessary to make some form of cake, cookies or brownies; good for my evening dessert requirement, not so great for my arteries.  But you can't have your cake and eat it too!...  Anyway.  I had a look through Everyday Easy Cakes & Cupcakes to see if anything for which I had all of the ingredients struck me, and I found a marble cake (p. 55).  It looked good, sounded easy, but since I hadn't actually used a recipe from this book before I thought I'd compare it to recipes from Martha Stewart and Joy of Baking.  Joy of Baking called for melted chocolate rather than cocoa powder as in the other two recipes, but since it was outnumbered and I had more cocoa powder than solid chocolate it was vetoed on that count.  Bake temps were the same across the board (350F), but Everyday Easy Cakes made me a bit uneasy with its hour-long bake time, as opposed to 35 minutes on the low-end of Joy of Baking and 50 minutes on the top end of Martha's recipe.  Ultimately I opted to use Martha's recipe as my basis (again), but I made some changes, beginning with one that might seriously cause you to question my excuse for this cake, if you haven't already.

Joy of Baking made the suggestion to add a tablespoon of brewed coffee to the chocolate portion of the batter to enhance the chocolate flavour.  When I read that, I remembered a trick from my days as a cake decorator: the baker would add espresso to one of the cakes (I think it was the flourless chocolate cake) to bring out the chocolate that much more.  Thus I got it in my head that I wanted to add not coffee, but espresso.  Of course, I don't own an espresso machine (much to my constant chagrin), so if I wanted to move forward with my caffeinated plans it was going to have to wait until the next day when I could get the espresso from town.  So much for my evening dessert.  The decaf tea that I settled for instead was a poor substitute, but I think the cake was worth the wait.


I only needed a tablespoon of espresso, but I got a double shot because, why not?  I might have needed the extra jolt for caking!

Martha's recipe calls for baking in a 9"x5" loaf tin, but I have an 11" tube pan, so it was necessary to double the recipe (what a shame).  Unfortunately, doubling the recipe meant that I was unexpectedly a bit short on caster sugar.  I made up the difference with about a 1/4 cup of light brown sugar, and if it made any difference at all I would suggest that it was a positive one; I tasted a bit of the batter pre-flavouring with extract and it was tasty.  How much of that should be attributed to flavour added from the light brown sugar as opposed to flavour from the buttermilk I'm not sure, but it may be worth experimenting.  I combined the two sugars well, breaking up the clumps formed by the light brown sugar as much as possible, before beating them into the butter.


I think the somewhat sticky light brown sugar did prevent the butter and sugar mixture from attaining a truly fluffy consistency, but I don't think it ultimately affected the consistency of the cake itself, and it all looked normal when I beat in the eggs.  I refrained from adding the vanilla extract at this stage because I wanted it only in the chocolate half of the batter; the other half was to be almond.  I didn't have buttermilk on hand, I never do, I just make it by adding white vinegar to milk in a 1 tablespoon to 1 cup ratio (that is, 1 tablespoon vinegar to 1 cup milk) and letting it sit for a couple minutes.  While that was sitting I combined the flour, baking powder and salt.  I chose to use plain flour rather than cake flour as Martha recommends because I wanted a denser cake.  Then I mixed half of that into the butter and sugar, then beat in the buttermilk, and finished off with the second half of the flour, baking powder and salt mix.  Next I split the batter in half.  I wanted half and half, rather than the slightly-more-vanilla-slightly-less-chocolate suggested by the recipes.


I added the extracts to the respective halves, vanilla going to the batch that was to be chocolate, and almond going to the other.  I was eager to try an almond extract that I had recently purchased because of its label and place of manufacture, and almond swirled with espresso and chocolate sounded mouthwatering to me...


Since adding the extracts after the split meant an additional mixing step I was careful to incorporate them without over-beating; I would certainly still eat a flat cake, but it was preferable that it rise.  As it turns out my fears were probably groundless, as I wound up having to mix the chocolate batch significantly more than the almond one.  When it came to the cocoa powder, Martha said to mix a 1/4 cup into 2 tablespoons boiling water.  The idea is to create a paste that will be easily mixed into the batter and prevent the formation of lumps of cocoa powder; the same technique is used for making red velvet cake, except in that case you substitute red dye for the water.  I was doubling the recipe, so I mixed a 1/2 cup cocoa powder into 3 tablespoons boiling water plus my 1 tablespoon of espresso.  This was all well and good, except the resultant paste was far too thick.  I knew this, I knew that I should add more water, and yet I opted to ignore my instincts and plopped the mass into the batter.  Mistake.  Unsurprisingly, I ended up with lumps of paste rather than lumps of powder.  I broke up as many of these as I could on the sides of my bowl with my spoon, and in the end it wasn't too bad, but I did have to mix far more than I would have liked to, and the chocolate batter was significantly looser than its almond counterpart.  Thankfully it rose anyway, just as well as the almond.

To get the marble effect, you have to spoon the two batters in a checkerboard pattern:


And then swirl (I used an offset spatula, but a knife would also work):


And it all rose!


And I really enjoyed it, both with a splash of brandy for dessert that night, and with a cup of coffee for breakfast in the morning.


* Ok, I admit it, I've gone to the grocery store in my pyjamas.  And yes, I've done so on more than one occasion.